Linux

Step-By-Step Setting Up Networking for Virtualization on OpenShift 4.19 for a Homelab

As we continue our Openshift journey to get virtualization working, we have a vanilla node already setup and now we need to get the networking configured. The examples here are from Openshift 4.19.17.

Networking in OpenShift is conceptually two parts that connect. The first part is the host level networking; this is your CoreOS OpenShift host itself. Then there is how do the pods connect into that networking. Usually, the network connects through your network interface card (NIC), to the Container Networking Interface (CNI), then to your pod. Here we will be using a meta plugin that connects between the NIC and the CNI called Multus. Redhat has a good post about it.

Host Level Networking

This part of the networking stack is straight forward if you are used to Linux system networking, and it is setup the same way. Treat the CoreOS node like any other Linux system. The big decision to make in the beginning is how many interfaces you will have.

Networking diagram without sub interface

If you have 1 interface and plan on using virtualization, are you going to use VLANs? If so, then you may want to move the IP of the interface off of the primary interface and onto a VLAN sub interface. This moves the traffic from untagged to tagged traffic for your network infrastructure.

Another reason is there are bugs in the Mellanox firmware, mlx5e, where Mellanox 4 and 5 cards can think you are double VLAN encapsulating, and will start automatically stripping VLAN tags. The solution is to move all traffic to sub interfaces. You will get an error in your dmesg/journalctl of: mlx5e_fs_set_rx_mode_work:843:(pid 146): S-tagged traffic will be dropped while C-tag vlan stripping is enabled

With the interface moved, that frees us up to use it for other VLANs as well. If you deployed network settings via a MachineConfig, you would have to override them there.

Networking diagram with sub interface

The rest of the configuration will be done via the NMState Operator and native Openshift.

NMState VLAN and Linux Bridge Setup

NMState is a Network Manager policy system. It allows you to set policies like you would in Windows Group Policy, or Puppet to tell each host how the network should be configured. You can filter down to specific hosts (I do that for testing, to only apply to 1 host) or deploy rules for your whole fleet assuming nodes are all configured the same way. It’s possible to use tags on your hosts to specify which rules go to which hosts.

NMState can also be used to configure port bonding and other network configurations you may need. After configuration, you get a screen that tells you the state of that policy on all the servers it applies to. Each policy sets one or more Network Manager configurations, if you have multiple NICs and want to configure all of them, you can do them in one policy, but it may be worth breaking the policies apart and having more granularity.

Another way to go about this section, is to SSH into each node, and use a tool such as nmtui to manually set the networking. I like NMState because I get a screen that shows all my networking is set correctly on each node, and updates to make sure it stays that way. I put an example below of setting up port bonding.

  • Go to the OpenShift web console, if you need to setup OpenShift I suggest checking out either my SNO guide or HA Guide.
  • Click Operators -> OperatorHub.
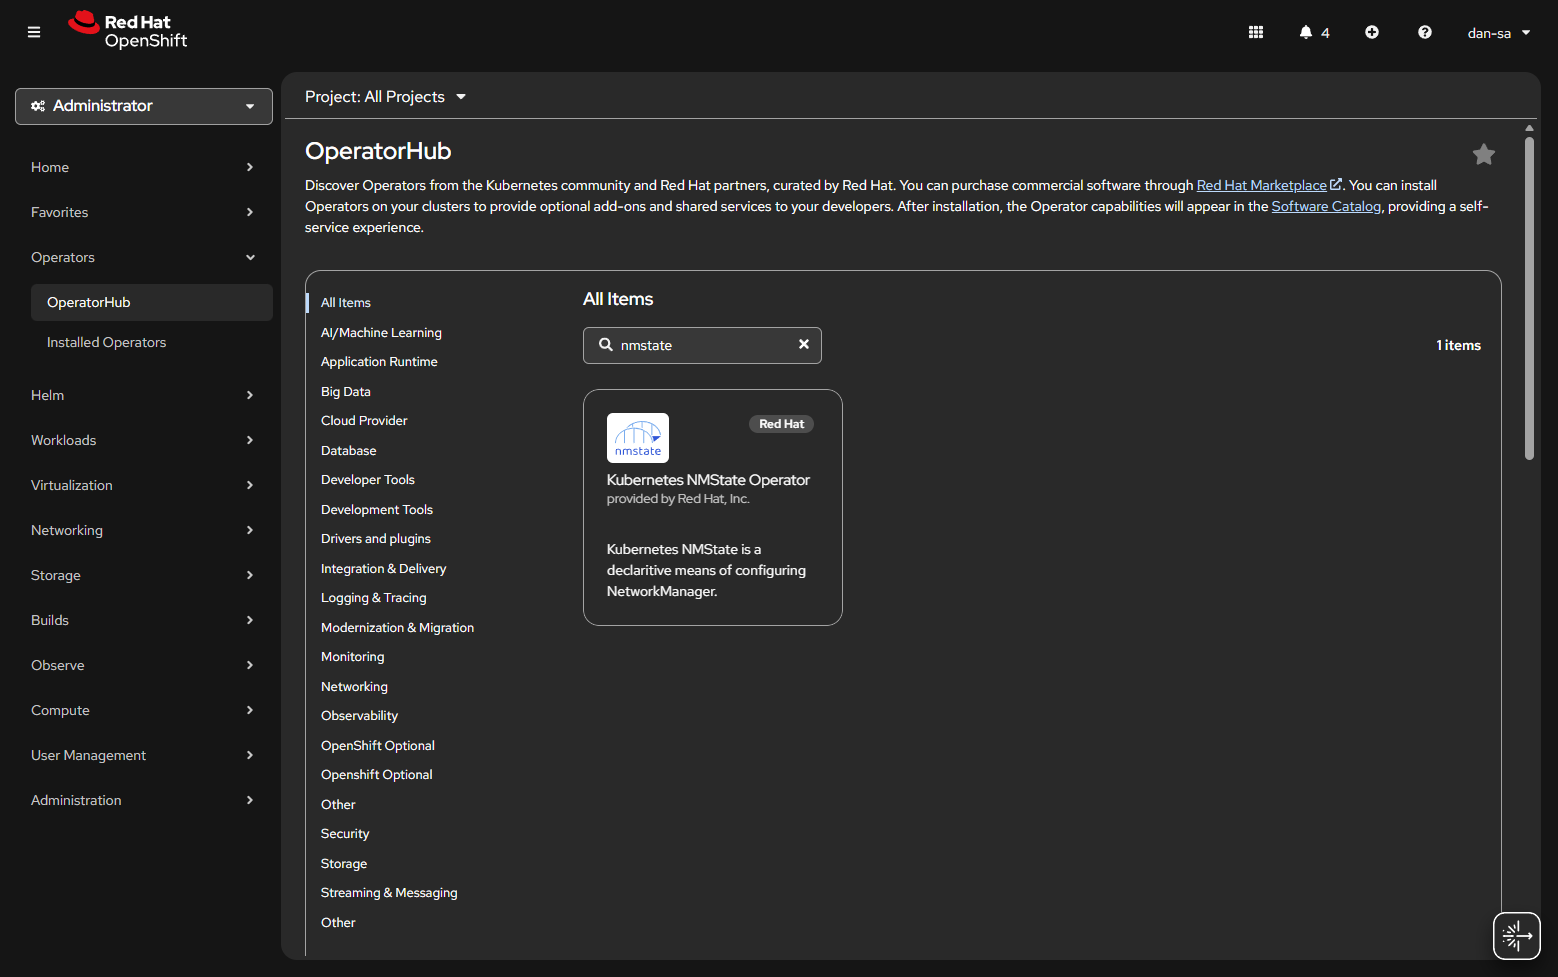
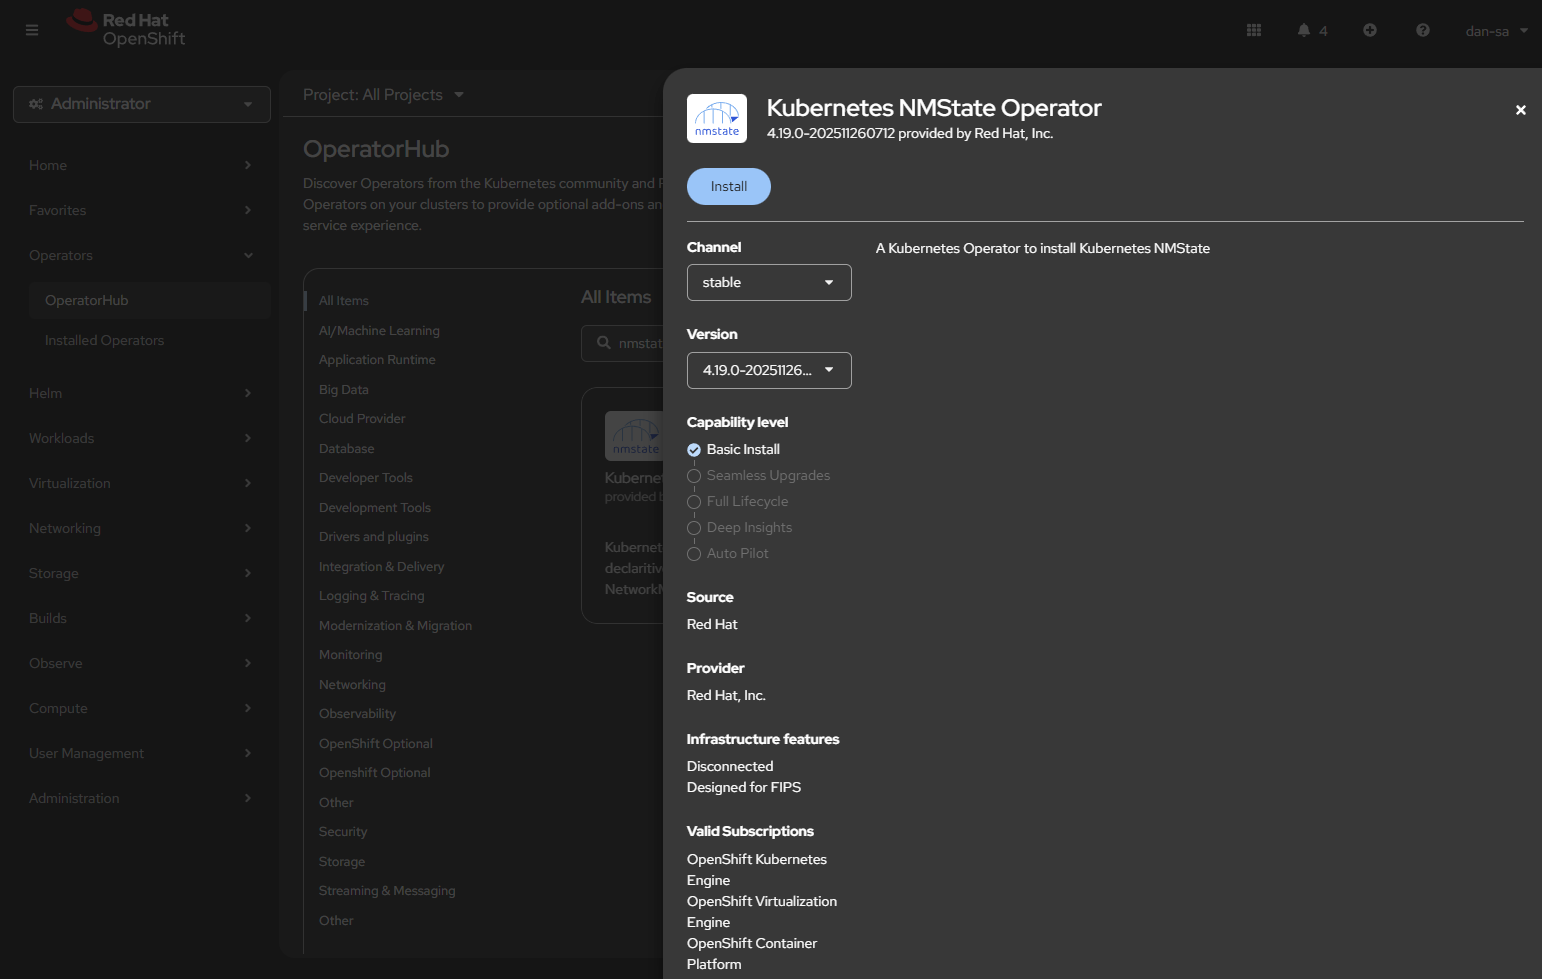
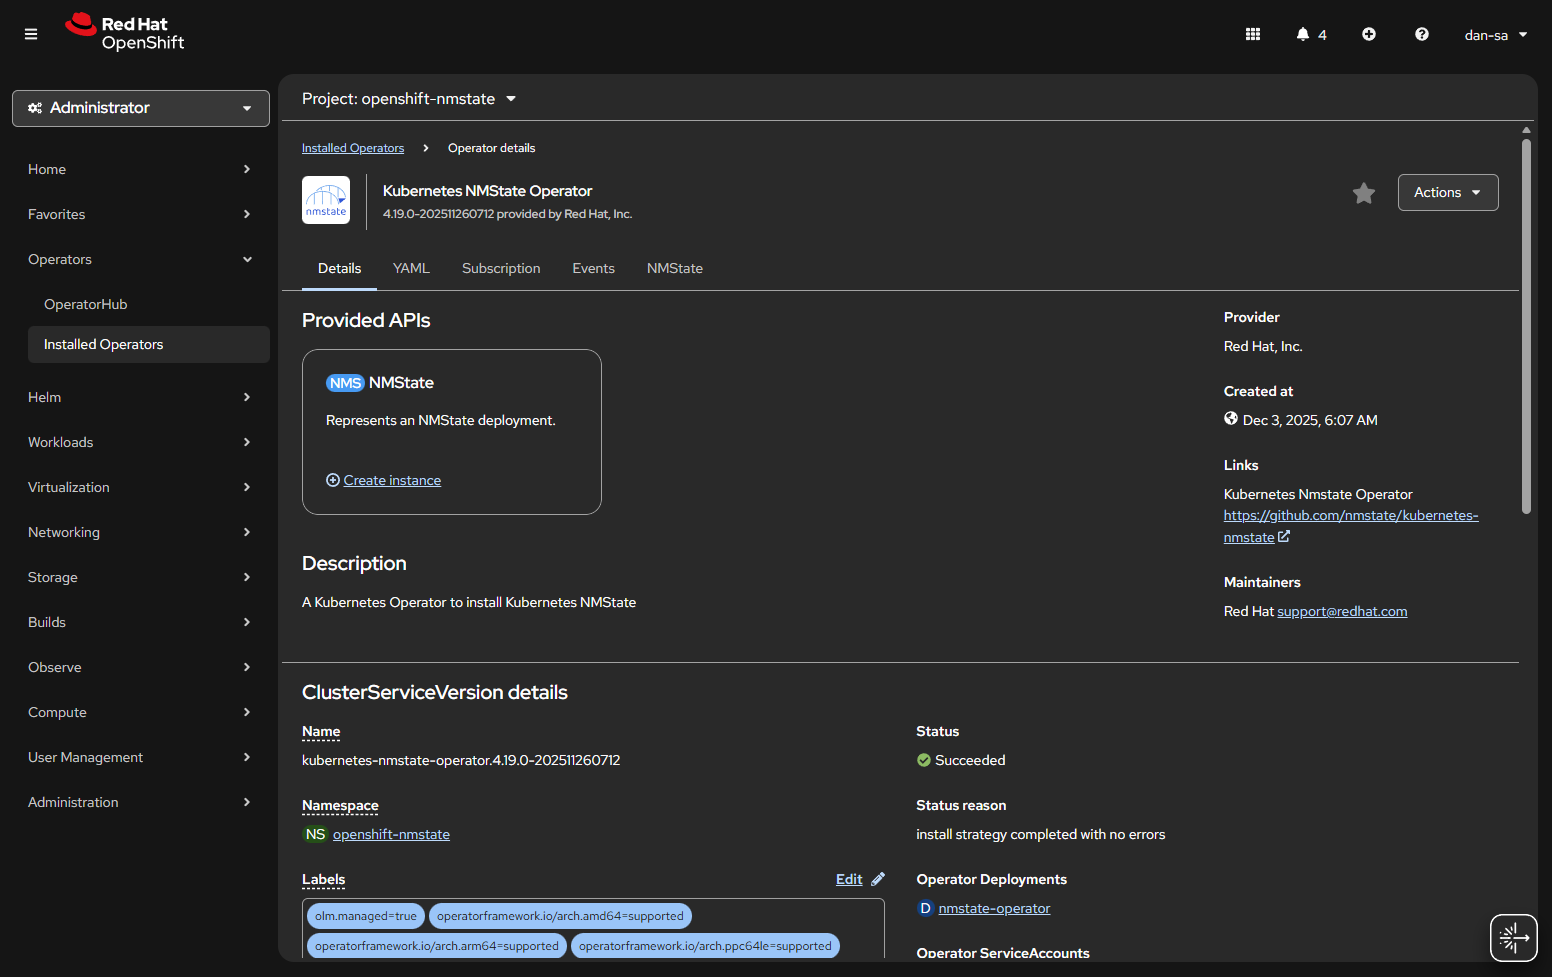
  • Once installed, you will need to create an “instance” of NMState for it to activate.
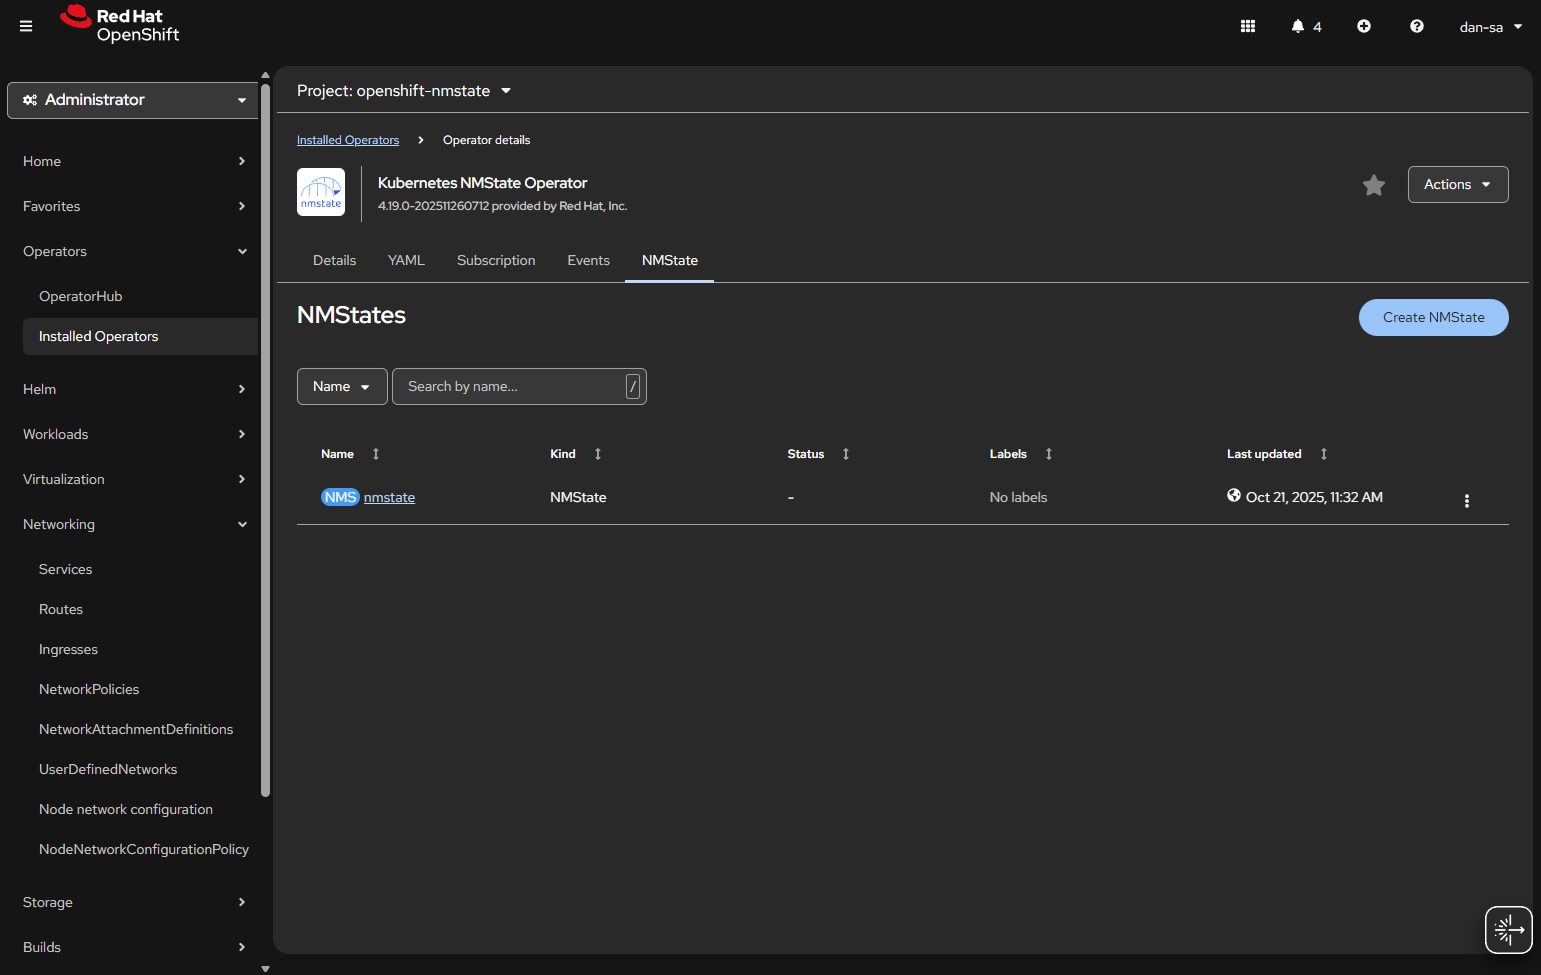
  • Then there will be new options under the Networking section on the left. We want NodeNetworkConfigurationPolicy. Here we create policies of how networking should be configured per host. This is like Group Policy or Puppet configurations.
  • At the NodeNetworkConfigurationPolicy screen, click “Create” -> “With YAML”.
  • We need to create a new sub-interface off of our eno1 main interface for our new vlan, then we need to create a Linux Bridge off that interface for our VMs to attach to.
apiVersion: nmstate.io/v1
kind: NodeNetworkConfigurationPolicy
metadata:
  name: vlan19-with-bridge           <-- Change This
spec:
  desiredState:
    interfaces:
      - name: eno1.19             <-- Change This
        type: vlan
        state: up
        ipv4:
          enabled: false
        vlan:
          base-iface: eno1
          id: 19                     <-- Change This
      - name: br19                   <-- Change This
        type: linux-bridge
        state: up
        ipv4:
          enabled: false
        bridge:
          options:
            stp:
              enabled: false
          port:
            - name: eno1.19       <-- Change This
              vlan: {}
  • Important things here:
    • Change the 19s to whichever VLAN ID you want to use.
    • “ipv4: enabled: false” says we want an interface here, but we are not giving it host level IP networking on our OpenShift node.
    • Remove the <– Change This comments
    • You MUST leave the “vlan: {}” at the end or it will not work, adding this tells it to leave vlan data how it is because we are processing via the kernel via sub interfaces.

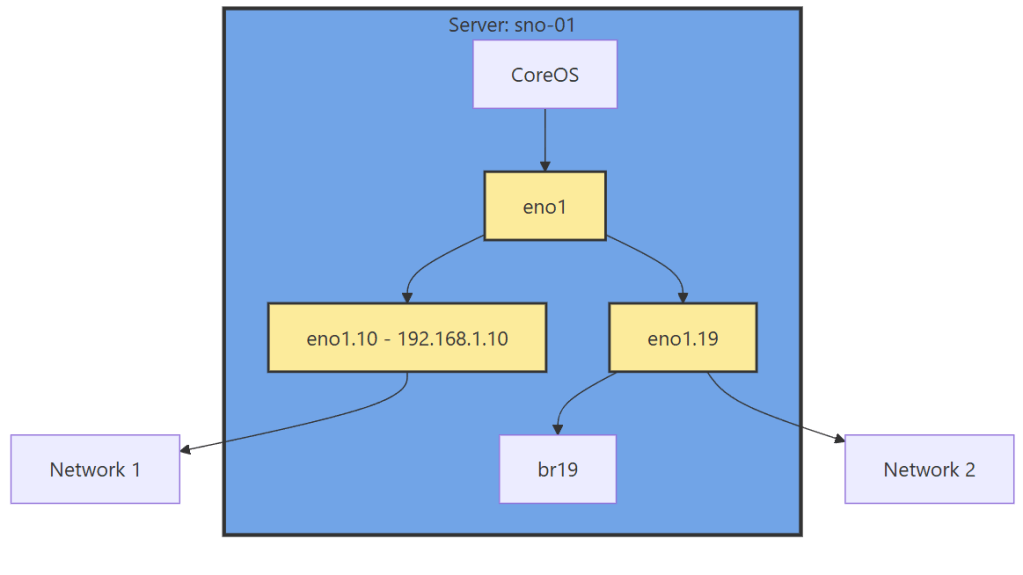
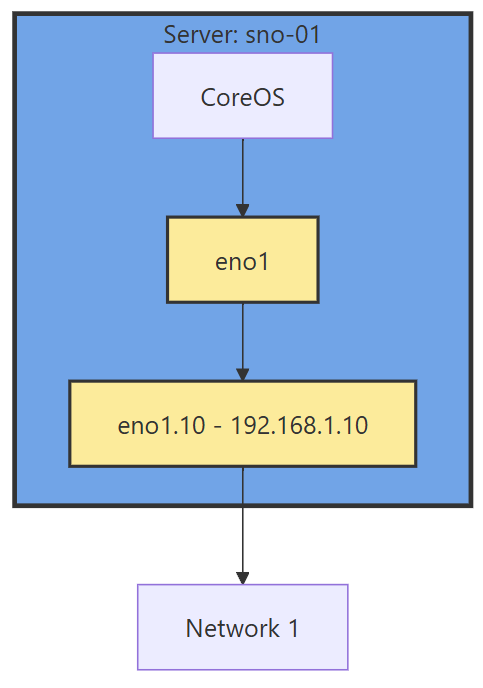
Now we have this configuration, with a secondary interface off of our NIC, and an internal Linux Bridge for the VMs.

The great thing about doing this configuration via NMState, it applies to all your nodes unless you put a filter in, and you get a centralized status about if each node could deploy the config.

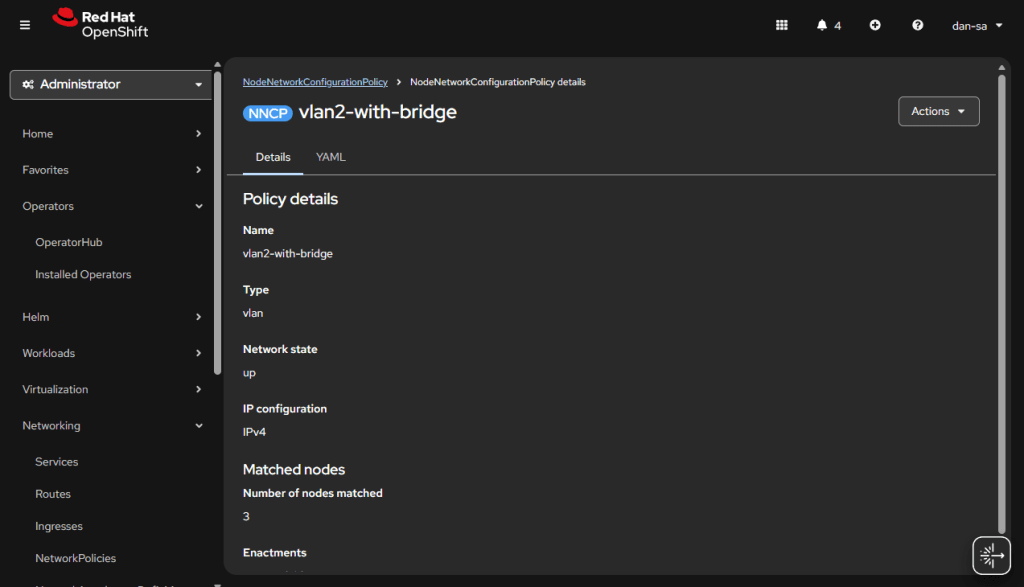
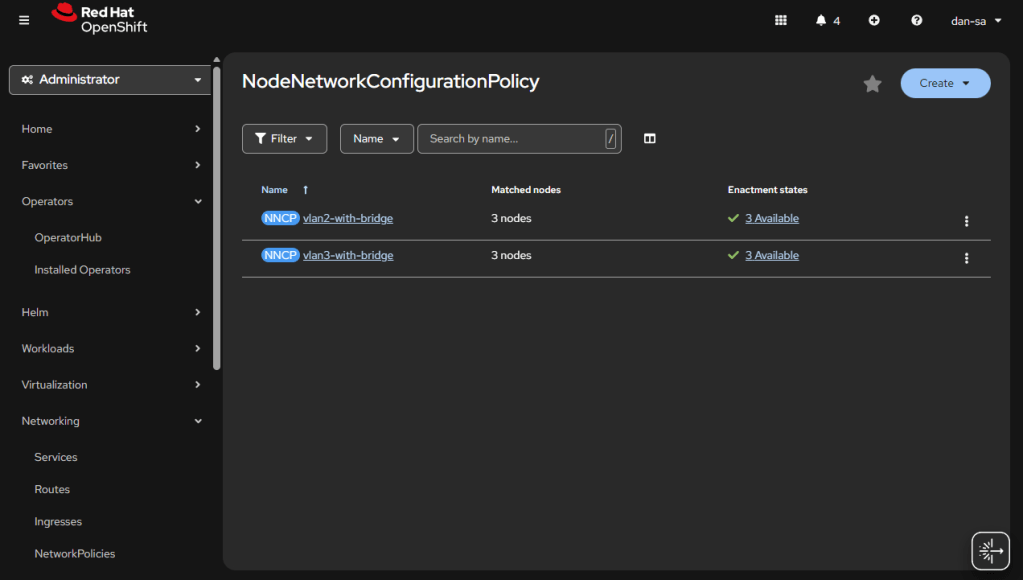
Here is an example from my Homelab, with slightly different VLAN IDs than we have been discussing. You can see all three nodes have successfully taken the configuration.

OpenShift VM Network Configuration

Kubernetes and OpenShift use Network Attachment Definitions (NADs) to configure rules of how pods can connect to host level networking or to the CNI. We have created the VLANs and Bridges we need on our host system, now we need to create Network Attachment Definitions to allow our VMs or other pods to attach to the Bridges.

  • Go to “Networking” -> “NetworkAttachmentDefinitions”.
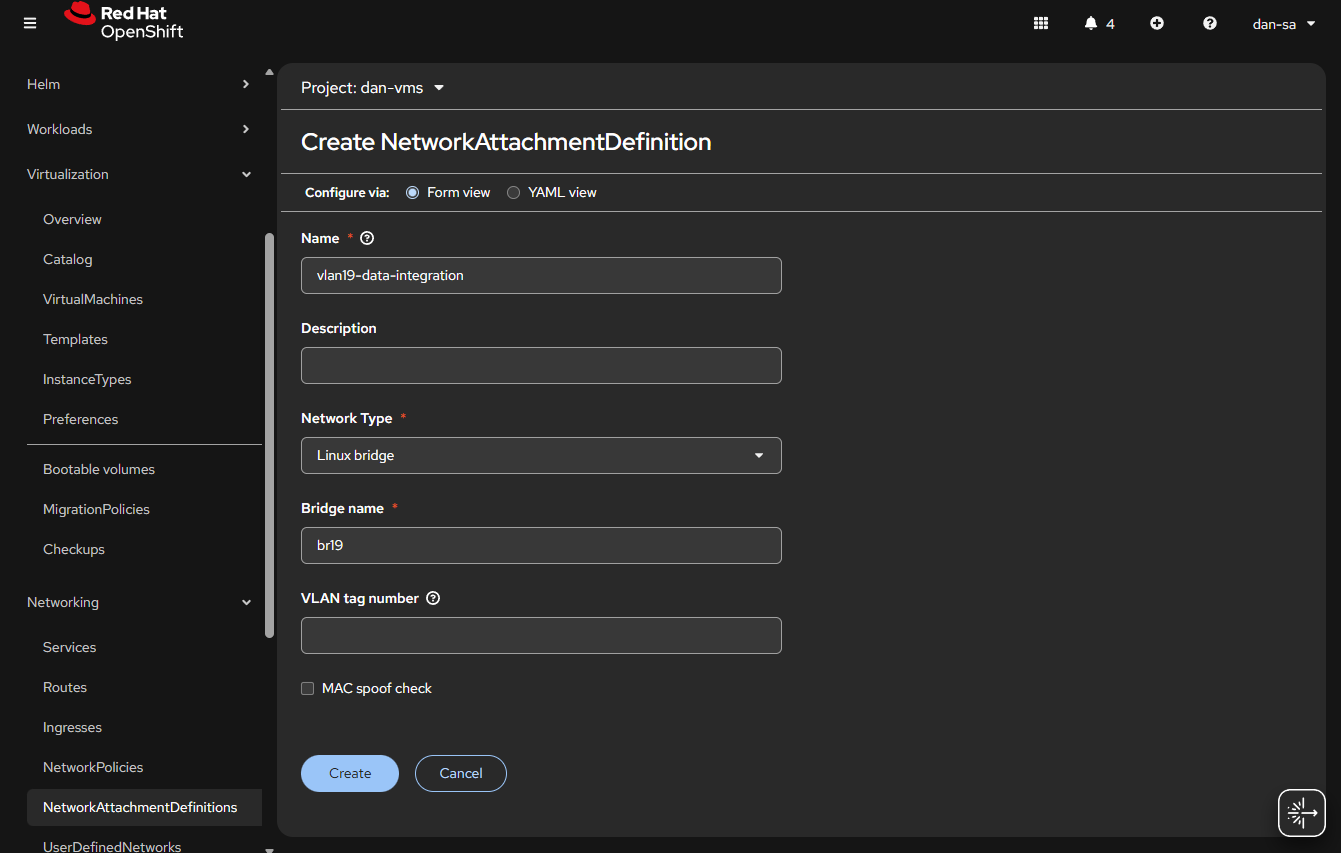
  • Click “Create NetworkAttachmentDefinition”
  • This is easily done, and can be done via the interface or via YAML, first we will do via the UI then YAML.
  • Before entering the name, make sure you are in the Project / Namespace you want to be in, NADs are Project / Namespace locked. This is nice because you can have different projects for different groups to have VMs and limit which networks they can go to.
  • Name: This is what the VM Operator will select, make it easy to understand, I do “vlan#-purpose“, example: “vlan2-workstations”.
  • Network Type: Linux Bridge.
  • Bridge Name: what was set above, in that example “br19“, no quotes.
  • VLAN tag number: Leave this blank, we are processing VLAN data at the kernel level not overlay.
  • MAC spoof check: Do you want the MAC addresses checked on the line. This is a feature which allows the network admin to pin certain MAC addresses and only send traffic out to those allowed. I usually turn this off.
  • Click “Create

The alternative way to do a NAD is via YAML, here is an example block:

apiVersion: k8s.cni.cncf.io/v1
kind: NetworkAttachmentDefinition
metadata:
  name: vlan19-data-integration
  namespace: default
spec:
  config: |-
    {
        "cniVersion": "0.3.1",
        "name": "vlan19-data-integration",
        "type": "bridge",
        "bridge": "br19",
        "ipam": {},
        "macspoofchk": false,
        "preserveDefaultVlan": false
    }

You can verify the NAD was created successfully by checking the NetworkAttachmentDefinitions list. Your networking is ready now. Next post, we will discuss getting storage setup.

Additional NodeNetworkConfigurationPolicy YAMLs

NIC Bonding / Teaming

Use mode 4 (802.3ad/LACP) if your switch supports link aggregation; otherwise mode 1 (active-backup) is the safest fallback.

apiVersion: nmstate.io/v1
kind: NodeNetworkConfigurationPolicy
metadata:
  name: bond0-config
spec:
  desiredState:
    interfaces:
      - name: bond0
        type: bond
        state: up
        ipv4:
          enabled: false
        link-aggregation:
          # mode=1 active-backup
          # mode=2 balance-xor
          # mode=4 802.3ad
          # mode=5 balance-tlb
          # mode=6 balance-alb
          mode: 802.3ad
          options:
            miimon: '140'
          port:
            - eno1
            - eno2

Useful Links

https://github.com/k8snetworkplumbingwg/multus-cni/blob/master/docs/how-to-use.md

https://medium.com/@tcij1013/how-to-configure-bonded-vlan-interfaces-in-openshift-4-18-0bcc22f71200

Funny icon for Openshift post

Step-By-Step Getting Started with High Availability OpenShift 4.19 for a Homelab

Last post, looked at getting started with a SNO (Single Node OpenShift) system. Next we will look at a build with multi-node, or multi-master, OpenShift. This runs the core service of etcd on more than one node, allowing for a single node failure. Some services like the virtual machine services need to run on a master as well, having more than one relieves pressure on that system. With SNO, if your master does not start, the entire cluster cannot start. In addition, SNO upgrades will always introduce downtime with the single master rebooting.

Master nodes do have more services than a simple worker, if you are running a small cluster with 3 nodes, you may want to decide if the extra overhead on the second and third nodes are worth it, or if you want to run leaner and run SNO with extra workers. In my experience of vanilla OpenShift, masters run about 20GB of ram more than worker nodes with no additional services on them.

I have a 3 node cluster that I was migrating from VMware and wanted to run HA. This allows me to do no downtime upgrades, with the three nodes sharing the control role.

My Setup

I am installing onto 3 HP Elitedesk 800 G5s, each with an Intel 9700, and 96GB of RAM (they can go to 128GB when RAM prices aren’t insane). I have a dual 10gb/s NIC in each for networking since I will be running ceph. This is the same Homelab cluster I have had for a bit. These machines aren’t too expensive, they have 8 cores each, can go to 128GB of RAM, and have several PCI slots, and NVMe slots. I have used this guide to install OpenShift 4.17-4.20.

Installation Steps for HA OpenShift

Any line starting with $ is a terminal command to use. The whole process will take about an hour; 30 minutes or so to collect binaries and prep your config files, a minute or two to create the ISO, then 30 minutes of the cluster sitting there and installing.

One important thing to say up front to those who have not used Openshift or Kubernetes before: there is 1 IP that all the applications use, the web server looks at the request coming in and WHICH DNS NAME YOU CONNECTED TO, and then routes your traffic that way. You can have 100% of the things setup right, and when you browser to the IP you get “Application is not available” when trying to access the console. This means the system is working! You just need to connect via the correct DNS name.

  1. Prerequisites: Start by going to the same place as the original post to get a pull secret and binaries you will need for the install. These include openshift-install, and oc.
  2. I am on Fedora 42 and needed to run sudo dnf install nmstate to install nmstate. This is required to transform the configs in the agent-config.yaml into the configs that will be injected into the installation ISO.
  3. Make a folder, called something like “ha-openshift”, and put all the binaries in there.
  4. Config Files: Before we had install-config.yaml, now we will have that AND agent-config.yaml.
  5. Below is an install-config.yaml, I will call out things you will want to change for your setup:
    • apiVersion: v1
      baseDomain: example.com
      compute:
      - architecture: amd64
      hyperthreading: Enabled
      name: worker
      platform: {}
      replicas: 0
      controlPlane:
      architecture: amd64
      hyperthreading: Enabled
      name: master
      platform: {}
      replicas: 3
      metadata:
      name: cluster1
      networking:
      clusterNetwork:
      - cidr: 10.131.0.0/16
      hostPrefix: 23
      machineNetwork:
      - cidr: 192.168.4.0/24
      networkType: OVNKubernetes
      serviceNetwork:
      - 172.30.0.0/16
      platform:
      baremetal:
      apiVIPs:
      - 192.168.4.5
      ingressVIPs:
      - 192.168.4.7
      pullSecret: '{"auths":{"cloud.openshift.com":{"auth":"b3Blbn==","email":"not-my-real-email@gmail.com"}}}'
      sshKey: ssh-rsa AAAAB
    • The “baseDomain” is the main domain to use, your hosts will be master0.<baseDomain>, the cluster name will be <metadata.name>.<baseDomain>. Make sure you put in what you want here because you can’t change it later. This is how users will reference the cluster.
    • Under workers and controlPlane, you put how many worker nodes and master nodes you want. This is a big difference between SNO and HA, we are saying 3 instead of 1 master.
    • metadata.name is the sub name of this exact cluster. You can have multiple clusters at lets say “example.com”, then setting this will make the cluster apps.cluster1.example.com. (Yes the DNS names get long with OpenShift)
    • clusterNetwork and serviceNetwork will be used internally for backend services, only change these if you are worried about the preset ones conflicting with your IP space.
    • machineNetwork.cidr is the IP space your nodes will live on, this needs to be set for your DHCP network. This is the range the network will use. Some of the IPs below will need static reservations in your DHCP network, the worker and master nodes can have general pool DHCP addresses. We are assuming DHCP here, you can statically assign IPs but its more work and not something I am going to talk about right here.
    • platform.baremetal.apiVIPs is where the API for your cluster will live, this is an additional IP the HA masters will hand back and forth to give the appearance of a single control plane.
    • platform.baremetal.ingressVIPs is another IP that will be handed back and forth but will be the HTTPs front door for applications.
  6. agent-config.yaml, I will call out things you will want to change:
    • apiVersion: v1alpha1
      kind: AgentConfig
      rendezvousIP: 192.168.4.10
      hosts:
        - hostname: hv1
          role: master
          rootDeviceHints:
            serialNumber: "AA22122369"
          interfaces:
            - name: enp1s0f0
              macAddress: 0c:c4:7b:1e:42:14
            - name: enp1s0f1
              macAddress: 0c:c4:7b:1e:42:15
          networkConfig:
            interfaces:
              - name: bond0.4
                type: vlan
                state: up
                vlan:
                  base-iface: bond0
                  id: 4
                ipv4:
                  enabled: true
                  address:
                    - ip: 192.168.4.10
                      prefix-length: 24
                  dhcp: false
              - name: bond0
                type: bond
                state: up
                mac-address: 0c:c4:7b:1e:42:14
                ipv4:
                  enabled: false
                ipv6:
                  enabled: false
                link-aggregation:
                  mode: 802.3ad
                  options:
                    miimon: "150"
                  port:
                    - enp1s0f0
                    - enp1s0f1
            dns-resolver:
              config:
                server:
                  - 192.168.3.5
            routes:
              config:
                - destination: 0.0.0.0/0
                  next-hop-address: 192.168.4.1
                  next-hop-interface: bond0.4
                  table-id: 254
        - hostname: hv2
          role: master
          rootDeviceHints:
            serialNumber: "AA22628"
          interfaces:
            - name: enp1s0f0
              macAddress: 0c:c4:7b:1f:06:e2
            - name: enp1s0f1
              macAddress: 0c:c4:7b:1f:06:e3
          networkConfig:
            interfaces:
              - name: bond0.4
                type: vlan
                state: up
                vlan:
                  base-iface: bond0
                  id: 4
                ipv4:
                  enabled: true
                  address:
                    - ip: 192.168.4.20
                      prefix-length: 24
                  dhcp: false
              - name: bond0
                type: bond
                state: up
                mac-address: 0c:c4:7b:1f:06:e2
                ipv4:
                  enabled: false
                ipv6:
                  enabled: false
                link-aggregation:
                  mode: 802.3ad
                  options:
                    miimon: "150"
                  port:
                    - enp1s0f0
                    - enp1s0f1
            dns-resolver:
              config:
                server:
                  - 192.168.3.5
            routes:
              config:
                - destination: 0.0.0.0/0
                  next-hop-address: 192.168.4.1
                  next-hop-interface: bond0.4
                  table-id: 254
        - hostname: hv3
          role: master
          rootDeviceHints:
            serialNumber: "203129F9D7"
          interfaces:
            - name: enp1s0f0
              macAddress: 0c:c4:7b:1f:03:c2
            - name: enp1s0f1
              macAddress: 0c:c4:7b:1f:03:c3
          networkConfig:
            interfaces:
              - name: bond0.4
                type: vlan
                state: up
                vlan:
                  base-iface: bond0
                  id: 4
                ipv4:
                  enabled: true
                  address:
                    - ip: 192.168.4.30
                      prefix-length: 24
                  dhcp: false
              - name: bond0
                type: bond
                state: up
                mac-address: 0c:c4:7b:1f:03:c2
                ipv4:
                  enabled: false
                ipv6:
                  enabled: false
                link-aggregation:
                  mode: 802.3ad
                  options:
                    miimon: "150"
                  port:
                    - enp1s0f0
                    - enp1s0f1
            dns-resolver:
              config:
                server:
                  - 192.168.3.5
            routes:
              config:
                - destination: 0.0.0.0/0
                  next-hop-address: 192.168.4.1
                  next-hop-interface: bond0.4
                  table-id: 254
    • rendezvousIP is an IP of a node in charge of the setup. You pick one of them to wait for all other masters/workers to be ready before starting the installation. It will wait for all nodes to be online, check they are ready, install them, then install itself.
    • The rest of this config is a three times repeated (one per host) setup of each host, things you will want to change:
  7. DNS Entries: Having created those two files, you know what you want your DNS to be. It’s time to go into your location’s DNS servers and enter addresses just like in the original post. These entries can be made at any time before you start the installation. In the end you should have 1 IP for ingress, 1 for api, then one per node.
    • api.cluster1.example.com -> apiVIPs, in my config 192.168.4.5
    • api-int.cluster1.example.com -> apiVIPs, in my config 192.168.4.5
    • *.apps.cluster1.example.com -> ingressVIPs, in my config 192.168.4.7
    • master0.cluster1.example.com -> node1 IP, in my config hv1 so I put 192.168.4.10
    • master1.cluster1.example.com -> node2 IP, in my config hv2 so I put 192.168.4.10
  8. Image Creation:
  9. $ mkdir ocp
  10. $ cp *.yaml ocp
  11. $ ./openshift-install –dir ./ocp/ agent create image 
  12. This will create a ocp/agent.x86_64.iso 
  13. Installation: Boot that iso on all servers. The image will use the hardware you specified in agent-config.yaml and DNS lookups to identify each node. Make sure the systems NTP is working, and their time looks correct, then that each node can curl:
    • registry.redhat.io 
      quay.io 
      cdn01.quay.io 
      api.openshift.com 
      access.redhat.com
  14. The stack should now install, the main server will show a screen saying the state of the other masters, and when they are all ready, it will proceed with install. This can easily take 30 minutes, and the screen on the rendezvous server can be slow to update.

With any luck you will have all the nodes reboot, and a running stack you can access at your console server location; here that would be console-openshift-console.apps.cluster1.example.com. Each node should show a normal Linux boot up sequence, then will show a login prompt, with that nodes name, and IP address(es). In this learning experience, feel free to restart the installation and the system will wipe the machines again.

In the ha-openshift folder, then the ocp subfolder there will be an auth folder. That will have the kubeadmin and kubeconfig files to authenticate to the cluster. The kubeadmin password can be used to login to oauth at console-openshift-console.apps.cluster1.example.com. The kubeconfig file can be used with the oc command downloaded from Redhat. using $ ./oc --kubeconfig ./ocp/auth/kubeconfig get nodes will show the nodes and their status from your installation machine.

Properly installed cluster example: 
~/homelab_openshift $ ./oc --kubeconfig ./ocp/auth/kubeconfig get nodes
NAME   STATUS   ROLES                         AGE   VERSION
hv1    Ready    control-plane,master,worker   44d   v1.32.9
hv2    Ready    control-plane,master,worker   44d   v1.32.9
hv3    Ready    control-plane,master,worker   44d   v1.32.9

This is an example of a successfully upgraded cluster running, and I am running the standard OpenShift oc get nodes command. Note: the version is the version of Kubernetes being run, not OpenShift.

I will continue this series with posts about Networking, Storage, and VM setup for OpenShift.

Troubleshooting

The install process for OpenShift has a big learning curve. You can make it a bit easier by using Redhats web installer, but that also puts some requirements on the system that a Homelab usually can’t hit, doing the agent based installer bypasses those checks. Once you get your configs dialed in, I have found it easy to reinstall a stack, but getting configs for a stack setup correctly the first few times is tough. The installer also does not do a ton to make it easier on you, if something goes wrong, the biggest indicators I have found are: when SSHed into the installer, the memory usage, the journalctl logs in the installer, and about 8-10 minutes into a good install, you will see the DVD image start to read a lot of data, constant activity on the indicator for a few minutes (that is the CoreOS being written to the disk).

Random things to check in a failing install:

  • SSH into a node using the SSH key in the install-config.yaml, run $ sudo journalctl and scroll to the bottom to see what’s going on, or just run $ sudo journalctl -f.
    • You may see something like:
      • “failing to pull image”: It can’t hit Redhat, or your pull secret expired
      • “ip-10-123-123-132.cluster.local node not recognized”: DNS entries need updated
  • If the system successfully reboots after an install, but you are not seeing the console start, SSH into a node using the SSH key in the install-config.yaml, run $ top. If your RAM usage is about:
    • 1GB, Kubernetes is failing to start, this could be a DNS or image download issue.
    • around 8GB, the core systems are attempting to come online, but something is stopping them such as an issue with the api or apps DNS names.
    • 12-16+GB of ram used, the system should be online.
  • Worth repeating for those who haven’t used Openshift before, internal routing is done via DNS names in your request, if you attempt to go to the ingress VIP via the IP you will get “Application is not available”. This is good! Everything is up, you just need to navigate to the correct URL.

Footnotes

Helpful examples: https://gist.github.com/thikade/9210874f322e72fb9d7096851d509e35

Step-By-Step Getting started with Single Node OpenShift (SNO) for a Homelab

Preface 

I will explain why OpenShift, and will have that blurb after the tutorial for those interested. I have some information for those completely new to OpenShift and Kubernetes (shorthand “K8s”), feel free to jump to “Installation Steps for Single Node OpenShift” for steps. This guide walks you through doing a Single Node OpenShift installation. This should take about 1-2 hours to have a basic system up and running.

In later posts I will go over networking, storage, and the rest of the parts you need to setup. I spoke to some of their engineers, and they were confused when I said this system is not easy to install, and they need to make an easy installation disc like VMware or Microsoft have. 

It is worth noting at this point that OKD exists. OKD is the upstream (well moving upstream), open-source version of OpenShift. You are more bleeding edge, but you get MOST of the stack without any licensing. Almost like CentOS was to Redhat Enterprise Linux, except more upstream than in line. There are areas where that is not true, and other hurtles to use it; but I am going to make another post about that. 

Single Node OpenShift vs High Availability

There are two main ways to run OpenShift, the first is SNO; Single Node OpenShift. There is no high availability, everything runs with 1 master node, which is also your worker node. You CAN attach more worker servers to a SNO system, but if that main system goes down, then you lose control of the cluster. The other mode to run in is HA, where you have at least 3 nodes in your control plane. For production you would usually want HA, and I will have an article about that in the future, for now I will just install SNO. 

Big Changes to Keep in Mind From VMware

A quick note to all the administrators coming from VMware or other solutions, OpenShift runs on top of CoreOS. An immutable OS based on Redhat and ostree. The way OpenShift finds out which config to apply to your node is via DHCP and DNS. These are HARD REQUIREMENTS to have setup for your environment. The installation will fail, and you will have endless problems if you do not have DHCP + DNS setup correctly; trust me, I have been there.

K8s Intro 101

For those who haven’t used Kubernetes before (me a few weeks ago), here are some quick things to learn. A cluster has “master” nodes and “worker” nodes, masters orchestrate, workers run pods. Master nodes can also be worker nodes.

OpenShift by default cannot run VMs. We are installing the Virtualization Operator, operators are like plugins, which will give us the bits we need to run virtualization. OpenShift has OpenShift Virtualization Operator, OKD has KubeVirt. OpenShift Virtualization Operator IS KubeVirt with a little polish on it and supported by Redhat.

Homelab SNO Installation 

OpenShift is built to have a minimum of 2 disks. One will be the core OS and the containers that you want to run. The other will be storage for VMs and container data. By default the installer does not support partitioning the disk, forcing you to have 2 disks. I wrote a script that injects partitioning data into the SNO configuration. The current SNO configuration does not seem to have another easy way to add this. The script: Openshift-Scripts/add_parition_rule.sh at main · daberkow/Openshift-Scripts, needs to be run right after “openshift-install”, Step 18. It is run with “$ ./add_parition_rule.sh ./ocp/bootstrap-in-place-for-live-iso.ign ./ocp/bootstrap-in-place-for-live-iso-edited.ign”, then “./ocp/bootstrap-in-place-for-live-iso-edited.ign” is used for Step 20. 

I am running on a Hp ProDesk 600 G5 Mini with an Intel 9500T, 64GB of RAM, and a 1TB NVMe drive. You need any computer you can install an OS onto with at least 100GB of storage and probably 32GB of RAM. Redhat CoreOS is a lot more accepting of random hardware than VMware ESXi is.

Installation Steps for Single Node OpenShift

OpenShift has several ways to do an installation, you can use their website and do the Assisted installer or create an ISO with all the details baked in, this time we will go over how to do it with creating a custom ISO with an embedded ignition file.

The following steps will be for a Mac or Linux computer. The main commands you will use interact with your cluster are `kubectl` and `oc`; `oc` is the openshift client, and a superset of the features in the standard `kubectl` command. Those tools work on Windows and have builds. The `openshift-installer` does not, so we can’t install with just Windows. You can try to use WSL to do the install, but it always gave me issues. The Linux system needs to be Rhel 8+/Fedora/Rocky 8+ or Ubuntu 20.10+ because of the requirement for Podman. 

As mentioned, DHCP + DNS are very important for OpenShift. We need to plan what our cluster DOMAIN and CLUSTER NAME will be. For this I will use “cluster1” as the cluster, and “example.com” as the domain. Our example IP will be 192.168.2.10 for our node. When I put a $ at the start of a line, that is a terminal command. 

  1. First, we will setup DNS, that is a big requirement for OpenShift, to do that you need a static IP address. Give the system a reservation or static IP address for your environment. 
  2. Now go and make the following addresses point to that IP, because we are on a single node, these can all point to one IP. Note this is for SNO, for larger clusters you need different hosts and VIPs for these IPs.
    1. api.cluster1.example.com -> 192.168.2.10
    2. api-int.cluster1.example.com -> 192.168.2.10
    3. *.apps.cluster1.example.com -> 192.168.2.10
    4. The two api addresses are used for K8s API calls, *.apps is a wildcard where all the sub apps within the cluster will be accessed. These applications use the referrer url of the web request to figure out where the traffic should go, thus everything has to be done via DNS name and not IP.
    5. Note: The wildcard for the last entry is needed for some services to work, you can individually add them, but it becomes a lot of work. Wildcards can not be used in hosts file, which means you do need proper DNS. There is a footnote for all the DNS entries you may if you want to run out of a hosts file.
  3. Go to Download Red Hat Openshift | Red Hat Developer
  4. Sign up for a Redhat Developer account and click “Deploy in your datacenter”. 
  5. Click “Run Agent-based Installer locally”. 
  6. Download the OpenShift installer, your “pull secret”, and a command line tool.
  7. Open a terminal and make a “sno” folder wherever you want. 
  8. Install Podman on your platform, if that’s Windows that means within WSL2, not on the Windows host.
  9. Copy/extract the openshift-installer, oc, and kubectl commands to that folder. 
  10. $ export OCP_VERSION=latest-4.19
  11. $ export ARCH=x86_64
  12. $ export ISO_URL=$(./openshift-install coreos print-stream-json | grep location | grep $ARCH | grep iso | cut -d\” -f4) 
  13. $ curl -L $ISO_URL -o rhcos-live-fresh.iso
    • I used “rhcos-live-fresh.iso” for the clean ISO, then copied it every time I needed to start over, I found this easier than redownloading. 
  14. $ cp rhcos-live-fresh.iso rhcos-live.iso 
  15. Create a text file called “install-config.yaml”, copy the following and edit for your setup: 

    • apiVersion: v1
      baseDomain: example.com
      compute:
      - name: worker
      replicas: 0
      controlPlane:
      name: master
      replicas: 1
      metadata:
      name: openshift
      networking:
      clusterNetwork:
      - cidr: 10.128.0.0/14
      hostPrefix: 23
      machineNetwork:
      - cidr: 192.168.2.0/24
      networkType: OVNKubernetes
      serviceNetwork:
      - 172.30.0.0/16
      platform:
      none: {}
      bootstrapInPlace:
      installationDisk: /dev/nvme0n1
      pullSecret: '{"auths":{"cloud.openshift.com":{"auth":"b3BllBFa…0M4NjNSaEo0RmNXZw==","email":"danisawesome@example.com"}}}'
      sshKey: |
      ssh-rsa AAAAB3QQe/… /h3Pss= dan@home

Note: I have removed most of my pull secret, and ssh key 

  • baseDomain: This is your main domain 
  • clusterNetwork: The internal network used by the system, DO NOT TOUCH 
  • machineNetwork: Network your system will have a NIC on, change this to your network 
  • serviceNetwork: Another internally used network, DO NOT TOUCH 
  • installationDisk: The disk to install to
  • pullSecret: Insert that secret downloaded from Redhat in Step 6 
  • sshKey: The public key to your local accounts ssh key, this will be used for auth later 
  1. $ mkdir ocp 
  2. $ cp install-config.yaml ocp 
  3. $ ./openshift-install –dir=ocp create single-node-ignition-config 
    • Optional to operate off a single disk
    • ./add_parition_rule.sh ./ocp/bootstrap-in-place-for-live-iso.ign ./ocp/bootstrap-in-place-for-live-iso-edited.ign
  4. $ alias coreos-installer=’podman run –privileged –pull always –rm  -v /dev:/dev -v /run/udev:/run/udev -v $PWD:/data  -w /data quay.io/coreos/coreos-installer:release’ 
  5. $ coreos-installer iso ignition embed -fi ocp/bootstrap-in-place-for-live-iso.ign rhcos-live.iso 
  6. Boot rhcos-live.iso on your computer, it will take 20 or more minutes, then the system should reboot
  7. If everything works, the system will reboot, then after 10 or so minutes of the system loading pods, https://console-openshift-console.apps.cluster1.example.com/ should load from your client computer. The login will be stored on your sno/ocp/auth folder. 
Openshift login screen

Many caveats here: if your install fails to progress, you can ssh in with the SSH key you set in the install-config.yaml file. That is the only way to get in. Check journalctl to see if there are issues. It’s probably DNS. You can put the host names above into the hosts file of the installer and then after reboot the host itself to boot without needing DNS.

You CAN build an x86_64 image using an ARM Mac. You can also create an ARM OpenShift installer to run on a VM on a Mac. The steps are very similar for an ARM Mac except they have aarch64 binaries at: mirror.openshift.com/pub/openshift-v4/aarch64/clients/ocp/latest-4.18/, and you use “export ARCH=aarch64”. Be careful on an ARM Mac about using the x86_64 installer for targeting an x86_64 server, and a aarch64 installer for ARM VMs. Or you will get “ERROR: release image arch amd64 does not match host arch arm64” and have to go to ERROR: release image arch amd64 does not match host arch arm64 – Simon Krenger to find out why. 

Hopefully this helps someone, I think OpenShift and OKD could be helpful for a lot of people looking for a hypervisor, but the docs and getting started materials are hard to wrap your head around. I plan to make a series of posts to help people get going. Feel free to drop a comment if this helps, or something isn’t clear.

DNS SNO Troubles

This section is optional, and for those who would like to run without external DNS for a stack. It can lead to the stack being odd, if you dont need this, you may not want to do it. All this was tested on 4.19.17.

The issue you run into here, is the fact that the way DNS works in OpenShift is pods are given CoreDNS entries, and they are given a copy of your hosts resolv.conf. In the event you want to start an OpenShift system completely air-gapped, with no external DNS, you need the entries we stated in other articles, mainly: api.<cluster>.<domain>, api-int.<cluster>.<domain>, *.apps.<cluster>.<domain>, master0.<cluster>.<domain>. Wildcard lookups cannot be in a hosts file. Luckily, because of this, OpenShift ships with dnsmasq installed on all the hosts.

Our flow for DNS will be: the host itself runs dnsmasq, and points to itself for DNS. It has to point to itself on its public IP because that resolv.conf file will be based onto pods; if you put 127.0.0.1 then pods will get that and fail to hit DNS. Then dnsmasq points to your external DNS servers. That way, all lookups hit dnsmasq first, then can be filtered to the outside.

When installing OpenShift: there is the install environment itself, then the OS after reboot, we need these entries to be in both environments.

I have created a script, it is used like the partition script I used in the SNO post. To use it, create your ignition files with openshift-install, then $ ./add_dns_settings.sh ./ocp/bootstrap-in-place-for-live-iso.ign ./ocp/bootstrap-in-place-for-live-iso-edited.ign and install with that edited ignition file.

This allows you to set all the settings you need, and a static IP setting for the host that will run single node. When installing this way, you will need to add some hosts file entries to your client because outside the cluster the DNS entries dont exist. The new SNO system is not in external DNS and that is how OpenShift routes traffic internally. Adding the below line to your clients hosts file with cluster and domain changed should be enough to connect:

192.168.1.10 console-openshift-console.apps.<cluster>.<domain> oauth-openshift.apps.<cluster>.<domain> 

Backstory About Why OpenShift

After all the recent price hikes by Broadcom for VMware, my work – like many – have been looking for alternatives. Not only do high hypervisor costs make it expensive for your existing clusters, it makes it hard to grow clusters with that high cost. We already run a lot of Kubernetes and wanted a new system that we could slot in, allowing for K8s and VMs to run side by side (without paying thousands and thousands per node that Broadcom wants). I was tasked with looking at alternatives out there, we were already planning on going with OpenShift as our dev team had started using it, but it doesn’t hurt to see what else is out there. The requirements were: had to be on-prem, be able to segment data by vlan, run VMs with no outside connectivity (more on that later), and have shared storage. There were more but those were the general guidelines. For testing the first thing I installed was Single Node OpenShift (SNO), and that’s what I will start going over here. It does do the job decently well enough, but the ramp up is rough. Gone are the VMware nice installers, and welcome to writing YAML files.

The big other players were systems like Hyper-V, Nutanix, Proxmox, Xen Orchestra, KVM. We are not a big Microsoft shop and a lot of our devs had a bad experience with Hyper-V, so we scratched that one. Also, Hyper-V doesn’t seemed all that loved by Microsoft for on-prem, so that turned us away. I investigated Nutanix but they have a specific group of hardware they want to work with, and a very specific disk configuration where each server needs 3 + SSDs to run the base install. I did not want to deal with that, so we moved on before even piloting it. Proxmox is a community favorite, but we didn’t want to use that for production networks, and thought getting it passed security teams at our customers would be difficult. Xen Orchestra is getting better but in testing had some rough spots and getting the cluster manager going gave some difficulty. This left raw KVM, and that was a non-starter because we want users to easily be able to manage the cluster. 

Without finding a great alternative, and the company already wanting to push forward on Redhat OpenShift, I started diving into what it would take to get VMs to where we needed them to be. What I generally found is there is a working solution here, that Redhat is quickly iterating on. It is NOT 1:1 with VMware. You are running VMs within Pods in a K8s cluster. That means you get the flexibility of K8s and the ability to set things up how you want; along with the troubles and difficulties of it. Like Linux, the great thing about K8s is there are 1000 ways to do anything, that also is its greatest weakness.

Footnotes / Reading Materials 

DNS Entries needed for normal use:

Chapter 2. Installing OpenShift on a single node | Installing on a single node | OpenShift Container Platform | 4.18 | Red Hat Documentation 

SNO on OCP-V – OpenShift Examples 

Red Hat OpenShift Single Node – Assisted Installer – vMattroman 

Fedora CoreOS VMware Install and Basic Ignition File Example – Virtualization Howto 

https://docs.redhat.com/en/documentation/openshift_container_platform/4.18/html/installing_on_bare_metal/user-provisioned-infrastructure#installation-user-infra-machines-advanced_vardisk_installing-restricted-networks-bare-metal

butane/docs/config-openshift-v4_18.md at main · coreos/butane 

Some useful information for networking: Deploying Single Node Openshift (SNO) on Bare Metal — Detailed Cookbook | by Reishit Kosef | Medium 

Offline installs 

https://hackmd.io/@johnsimcall/Sk1gG5G6o

Three, maybe foxes? With a Kerberos, ansible, and radio active hat

Using Kerberos to Authenticate WinRM for Ansible

I have been trying to get Kerberos auth working with WinRM to be the authentication for transport mechanism within Ansible. I want to configure a Window system, from the non-domain-joined Linux host that runs my automations. Getting these two hosts to talk over WinRM introduces a bunch of options and difficulties with each one. If you look at the table on Ansible’s website for Windows auth with WinRM, you see only a few options for a domain joined machine:

https://docs.ansible.com/ansible/latest/os_guide/windows_winrm.html#credssp

I specifically needed it for an Active Directory account part of my setup was creating lab machines and building domain controllers on the fly. Basic auth is out, Certificate is out, what is left is Kerberos, NTLM, or CredSSP. Then to throw another wrench in this, the Ansible host and server are in FIPS mode. At this point FIPS disables MD5. NTLMv2 uses MD5 internally, which means it does not want to work with an FIPS enabled machine. CredSSP is backed by NTLM hashes as well making Kerberos your only option.

I did not want to have to domain join my Ansible machine to my Windows Domain; this is a test environment. Through a bunch of tinkering I have found a way to run Ansible, and have Ansible use a local krb5.conf file, instead of your system one in /etc/krb5.conf.

  1. I am on Rocky and installed the following:
    • dnf install krb5-devel krb5-libs krb5-workstation python3.12-devel
    • pip3.12 install pykerberos gssapi krb5 pypsrp[kerberos]<=1.0.0
    • (Note I am using python 3.12 for my Ansible)
  2. You do need the host you wish to connect to have its FQDN accessible from your Ansible system (we will assume Linux)
    • This can be in the hosts file or DNS
  3. Then you need to set the inventory.yml similar to:
    • my-host-post-domain:
            ansible_host: host.example.com
            ansible_user: Admin@EXAMPLE.COM
            ansible_password: WindowsPassword123
            ansible_connection: winrm
            ansible_winrm_transport: kerberos
            ansible_winrm_kinit_cmd: “./kinit.sh”
            ansible_winrm_message_encryption: never
            ansible_winrm_server_cert_validation: ignore
  4. Create a file where you launch ansible from, kinit.sh:
    • #!/bin/bash
      cd “$(dirname “$0″)”
      export KRB5_CONFIG=./krb5.conf
      kinit $1
  5. Create your krb5.conf file
    • [libdefaults]
          default_realm = EXAMPLE.COM
          dns_lookup_realm = false
          dns_lookup_kdc = false
          ticket_lifetime = 24h
          renew_lifetime = 7d
          forwardable = true
          rdns = false

      [realms]
          EXAMPLE.COM = {
              kdc = 192.168.100.2
              admin_server = 192.168.100.2
          }

      [domain_realm]
          .example.com = EXAMPLE.COM
          example.com= EXAMPLE.COM

      (I am purposefully disabling DNS lookup and using my IP addresses, that is up to you.)
  6. Then I run my Ansible with the following:
    • KRB5_CONFIG=./krb5.conf ansible-playbook -i inventory.yml site.yml

It seems if you do not have the kinit.sh file, then kinit does not see the config. And if you don’t have the environment variable before the Ansible command, when Ansible goes to use GSS to connect to the Windows system, Ansible will not see the config.

Troubleshooting

Some fun errors along the way:

  • Server not found in Kerberos database
    • This means the server you are CONNECTING TO cant be found, usually this means the ansible_host is not the FQDN. Then when kinit is done it tries to connect to AD via the IP and that fails.
  • Kerberos auth failure for principal Admin@EXAMPLE.COM with subprocess: kinit: Cannot find KDC for realm \”EXAMPLE.COM\” while getting initial credentials
    • It cant find the krb5.conf file, OR under [domain_realm], your mapping has an issue

Systemctl: Assignment outside of section. Ignoring.

I wanted to throw together a quick post for a recent issue I have seen on Redhat 7/CentOS 7 boxes. A recent OS update has brought a small but important change to SystemD. In the past if you wanted to add environment variables to a SystemD service, you could enter # systemctl edit postgresql-14 (note I will be using postgresql-14 as the example service in this post), then add a line such as:

Environment=PGDATA=/opt/postgres/14/data/

After saving the file, and starting the service you are good to go. Recently after a minor update, I started getting the error “[/etc/systemd/system/postgresql-14.service.d/override.conf:1] Assignment outside of section. Ignoring.”, then the service would not start. It turns out, you can no longer drop Environment lines directly into the SystemD overrides, you need to mark which section of the SystemD file you are overriding. Below is the new proper way to go about this:

[Service]
Environment=PGDATA=/opt/postgres/14/data/

Quick fix, but can take a bit of digging. Also for SystemD and Postgres 14, this is the current way to easily redirect the data folder. Hope this helps someone!

CentOS 8 Migration

I have a pipeline which creates live images to network boot different systems. Historically this has been based on CentOS. A little while ago I moved it to CentOS 8 because I had some newer hardware that was not supported on the older kernel of 7. Everything was working well until recently when CentOS 8 went end of life, and I could no longer rely on the CentOS 8 Docker containers.

The journey began for a new EL8 system. I wanted to keep on EL8 instead of switching to Streams because all the other systems I had running were EL8 (CentOS 8 or RHEL8), and I wanted to keep compatibility. At the same time, I didn’t want to do a new build of the image, have things break, and not realize it was because of a CentOS Streams change upstream. I also used the CentOS 8 docker container which seems to have been pulled, so that forced me to do this change now.

My first thought was Oracle Linux. It has been around for a while, is ALMOST drop in compatible, and can be used without going and getting licenses (RHEL). (There are some small silly things like instead of “epel-release” the package is “oracle-epel-release-el8”) This lead to nothing but issues. I replaced all the repos I had in the image creation stage with Oracle Linux ones, then every build I got a ton of “nothing provides module(platform:el8)” lines for any package that used yum/dnf modules. I spent a chunk of time on this, finding no real answers, and one Oracle support page that looked like it could help saying I needed to buy a support contract. Classic Oracle. At one point I thought it had something to do with Commit – rpms/centos-release – 89457ca3bf36c7c29d47c5d573a819dd7ee054fe – CentOS Git server where a line in os-release confuses dnf, but then that line was there. Also Oracle doesn’t seem to have a kickstart url repo, which is needed to do this sort of network boot. They wanted the end user to set that repo up, which may be the source of my issues. This also touched on the issue Disable Modular Filtering in Kickstart Repos – Red Hat Customer Portal, but I wasn’t even getting to a base OS setup, then I could make changes to the os and dnf for how it processes modules.

In my searches I did find this nice script to get bash variables for OS and version. https://unix.stackexchange.com/a/6348

Then I figured I would try either AlmaLinux or Rocky Linux. They both came out around when Redhat said Cent 8 was going away. Looking into both projects, they both are backed by AWS and Equinix who are big players, which made me feel a bit better about it. I had heard a bit more about Rocky and its support, so I tried that. I dropped in the new repos, and kickstart location, and everything just worked… Even things that were a issue when playing with Oracle Linux went away. For example, epel-release was once again called what it should be.

In the end so far it seems to be happy! We will see if any other small differences pop up and bite me…

Below is an example of the top of the kickstart I am using, if anyone is interested in more of how I create live images, leave a comment and I can do a post on it:

lang en_US.UTF-8
keyboard us
timezone Europe/Brussels --isUtc
auth --useshadow --enablemd5
selinux --disable
network --device=eno1 --bootproto=dhcp
skipx
part / --size 4096 --fstype ext4
part /opt --size 4096 --fstype ext4
firewall --disabled

url --url=https://download.rockylinux.org/pub/rocky/8/BaseOS/x86_64/kickstart/

# Root password
rootpw --iscrypted <Insert encrypted password here>

repo --name=baseos --baseurl=https://download.rockylinux.org/pub/rocky/8/BaseOS/x86_64/os/ --install
repo --name=extras --baseurl=https://download.rockylinux.org/pub/rocky/8/extras/x86_64/os/ --install
repo --name=appstream --baseurl=https://download.rockylinux.org/pub/rocky/8/AppStream/x86_64/os/ --install

SSSD with Active Directory Only Showing Primary Group

I was domain joining some Redhat Enterprise Linux 7 boxes to a Windows domain. Everything went smoothly except many of my users could only see their Primary groups. Some users whom had more permissions on the domain could see all their groups, just not some particular users. This seems to be a common failure scenario for SSSD with AD, and many people have opened bugs or chimed in with different fixes online. I found the solution on one forum post, and it saved me, and I wanted to amplify it.

As long as some of your users can see all their groups, you know its not exactly a problem with RHEL connecting to AD, or a protocol like LDAP being blocked. A odd side effect of this setup was periodically the groups could be scanned and then it would show the users in that group. If I ran “sss_cache -E“, then “getent group SecondaryGroup“, some of the time it would show the users inside the group. Then once the user logged in, the user would be removed via that command, as well as when I ran “groups” under the user.

The SSSD log didnt have a ton of help other than it couldn’t read all the groups. I tried a TON of the recommended settings, like enabling enumerate = True, enumerate = false, ldap_use_tokengroups = true, ldap_use_tokengroups = false; none of these changed anything. Then https://serverfault.com/a/938893 mentioned it may be a permissions problem between the computer object in AD and the user object. I looked and sure enough, my system had NO permissions on the users that were failing. I attempted to add the tokenGroups permission mentioned in this article and that still didnt help, but we were on the right track!

The answer came from https://serverfault.com/a/796005, there is a permission needed called “Read Remote Access Information”, once that is granted to your computer object onto the user, then secondary groups will start populating. I gave “Domain Computers” that permission, since it seemed to only be effecting some of the Linux systems and Windows was happy to have it as well.

Some random commands that can help you debugging SSSD:

SSSD likes to cache a lot, making it hard to troubleshoot, using the following clears all caches and restarts SSSD:

systemctl stop sssd && rm -rf /var/lib/sss/db/* && rm -rf /var/lib/sss/mc/* && systemctl start sssd

CentOS/Rhel 8 Auto login Fix

I have a PXE environment that requires systems to boot up, then automatically login and start a program on boot. All of a sudden this stopped working after years of working. It took me a while to figure it out so figured I would post in case anyone else ran into this.

I have been doing auto login the recommended systemd for a while, as shown: https://wiki.archlinux.org/title/Getty. I copied /lib/systemd/system/getty@.service into /etc/systemd/system/getty@tty1.service. Then with a script edited it using sed in the build pipeline. In the end the line was:

ExecStart=-/usr/bin/agetty --noclear %I $TERM --autologin username

This worked for YEARS, then suddenly stopped. In investigating, I saw another file was being written next to mine at /etc/systemd/system/getty@tty1.servicee ; with another e added to the end of service, making it servicee. After a lot of playing around with it and looking at other guides I figured out, there was a update to systemd/getty and now it cares that all options are before the terminal variable is presented. Changing that line to the following fixed it.

ExecStart=-/usr/bin/agetty --noclear --autologin username %I $TERM