I was experimenting with integrating CentOS with my home Active Directory (AD) cluster. I wanted centralized user management, and for a stretch goal, get PKI login working for Smart Card auth. I have used winbind before to connect CentOS 6 to Active Directory, that configuration before was a bit annoying. These days with CentOS/RHEL 7 and 8 we have SSSD, which is more straight forward. For all the following tests I used Putty-CAC (link), a Windows app that allows GSSAPI, and Smart Card auth.
SSSD Config
I will start off with my experience, then follow up with a how to; for this article I already have AD configured to support Smart Card auth, and have stored the Smart Card public key for my user. I will follow up with an article about that configuration. Active Directory integration is straight forward and easy. One setting you can enable is: hiding the domain names from the username, this allows the users to feel native to the system. Using users and groups are easy; I made a group to which I gave sudo access. When using Smart Cards you will need to put NOPASSWD in the sudo entry for that group, because the Smart Card users usually do not have passwords, usually… You can use Smart Card auth with Active Directory AND a password as long as you do not set “Smart card is required for interactive logon”. If you do check that box, AD sets a random password on the backend for that user.
After setup, with this config we store the authorized_keys in AD under the attribute altSecurityIdentities. The main tool to debug Smart Card auth is the tool sss_ssh_authorizedkeys, this allows you to have the system attempt to pull their ssh key on demand. A big warning about SSSD, it loves to cache information. If you attempt to run that command, and then make changes to your sssd.conf or AD, and re-run sss_ssh_authorizedkeys, it will fail because it is caching the failed lookup from before. My recommended command as root between tests where it may be caching is:
systemctl stop sssd && rm -rf /var/lib/sss/db/* && rm -rf /var/lib/sss/mc/* && systemctl start sssdSSSD Config
1. Setup hostnamectl (make sure your host knows what its name is supposed to be) and dns, for SSSD to work well you need the system to be able to find itself in DNS, you can set up SSSD to auto register with dynamic DNS (more on that later)
2. Install Packages
     - Ubuntu
       apt -y install realmd sssd sssd-tools libnss-sss libpam-sss adcli samba-common-bin oddjob oddjob-mkhomedir packagekit
     - CentOS
       sudo yum install realmd sssd oddjob oddjob-mkhomedir adcli samba-common samba-common-tools krb5-workstation
At this point running “# realm discover your_domain_fqdn” will list out services your domain needs for users to login. Usually the main program you need to enable is oddjobd which will create home directories when users login. Note, for these examples I find it easier to have a domain in them than the subsistute it, I will use my home test domain “home.ntbl.co” here.
3. systemctl enable oddjobd
4. systemctl start oddjobd
5. realm join -U admin_user_on_domain home.ntbl.co
6. vim /etc/sudoers.d/winadmins
Add the line “%domain\ admins@home.ntbl.co ALL=(ALL) ALL“, where “domain admins” is a group I have in AD, and “home.ntbl.co” is my domain. This setup does not support Smart Card login with sudo, since you need NOPASSWD for that sudo login. Example "%domain\ admins@home.ntbl.co ALL=(ALL) NOPASSWD:ALL". You can create a sub sudo file like I did here, or visudo to edit sudo and have it syntax checked.
7. Below is my /etc/sssd/sssd.conf without Smart Card auth setup.
 [sssd]
 domains = home.ntbl.co
 config_file_version = 2
 services = nss, pam

 [domain/home.ntbl.co]
 ad_domain = home.ntbl.co
 krb5_realm = HOME.NTBL.CO
 realmd_tags = manages-system joined-with-adcli
 cache_credentials = True
 id_provider = ad
 krb5_store_password_if_offline = True
 default_shell = /bin/bash
 ldap_id_mapping = True
 use_fully_qualified_names = false
 fallback_homedir = /home/%u@%d
 access_provider = ad

 dyndns_update = true
 dyndns_refresh_interval = 43200
 dyndns_update_ptr = true
 dyndns_ttl = 3600
Adding “use_fully_qualified_names” changes your username from “dan@home.ntbl.co” to “dan”. Not a requirement, but a nice, quality of life setting. The bottom adds dynamic dns, which will push your IP to AD DNS. Windows does dynamic DNS updates by default, and unless the systems are statically assigned, or even if they are, this can be a nice feature. Now "systemctl stop sssd" and “systemctl start sssd”, then you should be able to login with your AD account.
GSSAPI
Before getting into Smart Card auth, I wanted to briefly mention GSSAPI. This is a method to do auth between systems. It allows Windows clients to one click login to SSH by passing an auth token from your Windows session right to SSH. If you setup SSSD, enable GSSAPIAuthentication in /etc/ssh/sshd_config then you can use an app like Putty-CAC to SSH with GSSAPI. I have found this usually works with SSSD by just setting GSSAPI to yes. If you just want to admin Linux from AD, and have no other requirements I would suggest you look into this for your environment because it is so easy. If you are going to follow the rest of the guide, make sure to turn GSSAPI back off, or it will log you in automatically and you may think it’s Smart Card auth working; that fooled me for a few minutes.
Smart Card Auth
For all of my tests, I used the following Smart Card, Amazon link. I think these other cards would work as well, and they are cheaper; but I have not personally tried them. Amazon link. I may write an article later about setting up these cards, if you are interested write a comment below.
Add Certs to AD
You need the Smart Card’s public key data in SSH authorized_keys format. This guide will show you how to get that string from Putty CAC. You have to enjoy when a .gov site tells you to go to user NoMoreFood and get security software, the open source world is great.
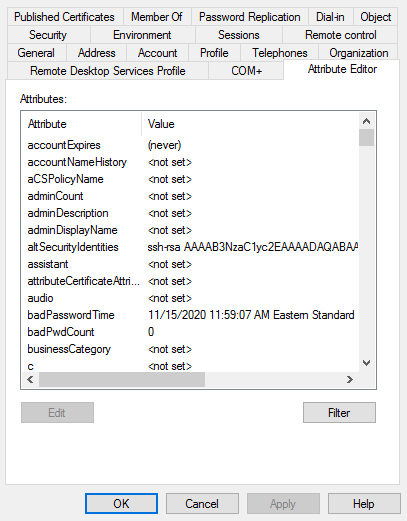
In Active Directory, go to Active Directory Users and Computers, turn on Advanced Features, by going to the View menu, and enabling Advanced Features. Then select the user you want to add ssh keys for, and select the “Attribute Editor” tab. You will find an entry at the top called “altSecurityIdentities”, add the line that would usually be in ~/.ssh/authorized_keys there, it should look like “ssh-rsa key_stuff”.

Configuring SSSD for Cert Auth
To add Smart Card auth to SSSD, just add the following to your sssd.conf, merge the sections with the ones from above.
[sssd]
services = nss, pam, ssh, sudo

[pam]
pam_cert_auth = True

[domain/home.ntbl.co]
enumerate = True
ldap_user_extra_attrs = altSecurityIdentities:altSecurityIdentities
ldap_user_ssh_public_key = altSecurityIdentities
ldap_use_tokengroups = True
Now restart sssd. If you run "sss_ssh_authorizedkeys dan" with dan replaced with your name, then you SHOULD get a key back if everything is setup correctly. If you do not get a key back, use the command below to reset sssd and reload. If you still do not get a key then you will need to edit settings in sssd.conf, and continue to tweak:
systemctl stop sssd && rm -rf /var/lib/sss/db/* && rm -rf /var/lib/sss/mc/* && systemctl start sssdI will say this does seem to take some trial and error. /var/log/sssd/ has some good logs that can help point you in the correct direction if you are running into issues. One quick note I will make, you may see people online say “use the command ‘sss_ssh_authorizedkeys -debug 4 home.ntblc.o’ to debug the command.” This command does not have a debug throw, what this does is uses the -d argument which is domain, then tries to parse the rest. You end up with key lookup attempts on domain “ebug” for user 4. Sadly sss_ssh_authorizedkeys is not very verbose, debugging it is a bit of a pain; do not listen to people who mention the above debug command, at least on CentOS/Rhel 7 and 8 it does not work.
As long as you are getting a key back from the above command, then you can wire it into SSH. Edit /etc/ssh/sshd_config with the following, note some sites say AuthorizedKeysCommandUser should be root, some say it should be nobody. I error on the side of lesser permissions and set it to:
 AuthorizedKeysCommand /usr/bin/sss_ssh_authorizedkeys
 AuthorizedKeysCommandUser nobody
Hope something here has helped someone, feel free to drop a comment.
