Last post, looked at getting started with a SNO (Single Node OpenShift) system. Next we will look at a build with multi-node, or multi-master, OpenShift. This runs the core service of etcd on more than one node, allowing for a single node failure. Some services like the virtual machine services need to run on a master as well, having more than one relieves pressure on that system. With SNO, if your master does not start, the entire cluster cannot start. In addition, SNO upgrades will always introduce downtime with the single master rebooting.
Master nodes do have more services than a simple worker, if you are running a small cluster with 3 nodes, you may want to decide if the extra overhead on the second and third nodes are worth it, or if you want to run leaner and run SNO with extra workers. In my experience of vanilla OpenShift, masters run about 20GB of ram more than worker nodes with no additional services on them.
I have a 3 node cluster that I was migrating from VMware and wanted to run HA. This allows me to do no downtime upgrades, with the three nodes sharing the control role.
My Setup
I am installing onto 3 HP Elitedesk 800 G5s, each with an Intel 9700, and 96GB of RAM (they can go to 128GB when RAM prices aren’t insane). I have a dual 10gb/s NIC in each for networking since I will be running ceph. This is the same Homelab cluster I have had for a bit. These machines aren’t too expensive, they have 8 cores each, can go to 128GB of RAM, and have several PCI slots, and NVMe slots. I have used this guide to install OpenShift 4.17-4.20.
Installation Steps for HA OpenShift
Any line starting with $ is a terminal command to use. The whole process will take about an hour; 30 minutes or so to collect binaries and prep your config files, a minute or two to create the ISO, then 30 minutes of the cluster sitting there and installing.
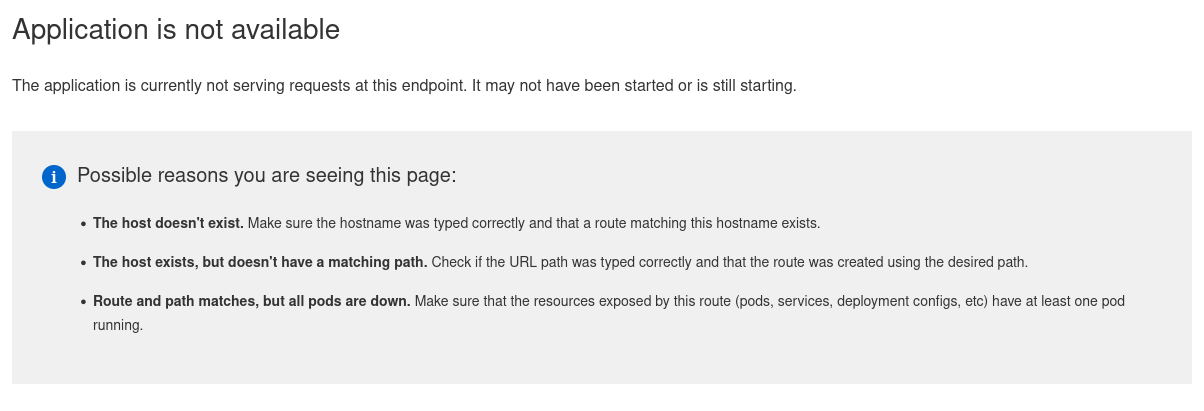
One important thing to say up front to those who have not used Openshift or Kubernetes before: there is 1 IP that all the applications use, the web server looks at the request coming in and WHICH DNS NAME YOU CONNECTED TO, and then routes your traffic that way. You can have 100% of the things setup right, and when you browser to the IP you get “Application is not available” when trying to access the console. This means the system is working! You just need to connect via the correct DNS name.
- Prerequisites: Start by going to the same place as the original post to get a pull secret and binaries you will need for the install. These include openshift-install, and oc.
- I am on Fedora 42 and needed to run
sudo dnf install nmstateto install nmstate. This is required to transform the configs in the agent-config.yaml into the configs that will be injected into the installation ISO. - Make a folder, called something like “ha-openshift”, and put all the binaries in there.
- Config Files: Before we had install-config.yaml, now we will have that AND agent-config.yaml.
- Below is an install-config.yaml, I will call out things you will want to change for your setup:
apiVersion: v1
baseDomain: example.com
compute:
- architecture: amd64
 hyperthreading: Enabled
 name: worker
 platform: {}
 replicas: 0
controlPlane:
 architecture: amd64
 hyperthreading: Enabled
 name: master
 platform: {}
 replicas: 3
metadata:
 name: cluster1
networking:
 clusterNetwork:
 - cidr: 10.131.0.0/16
 hostPrefix: 23
 machineNetwork:
 - cidr: 192.168.4.0/24
 networkType: OVNKubernetes
 serviceNetwork:
 - 172.30.0.0/16
platform:
 baremetal:
   apiVIPs:
   - 192.168.4.5
   ingressVIPs:
   - 192.168.4.7
pullSecret: '{"auths":{"cloud.openshift.com":{"auth":"b3Blbn==","email":"not-my-real-email@gmail.com"}}}'
sshKey: ssh-rsa AAAAB- The “baseDomain” is the main domain to use, your hosts will be master0.<baseDomain>, the cluster name will be <metadata.name>.<baseDomain>. Make sure you put in what you want here because you can’t change it later. This is how users will reference the cluster.
- Under workers and controlPlane, you put how many worker nodes and master nodes you want. This is a big difference between SNO and HA, we are saying 3 instead of 1 master.
- metadata.name is the sub name of this exact cluster. You can have multiple clusters at lets say “example.com”, then setting this will make the cluster apps.cluster1.example.com. (Yes the DNS names get long with OpenShift)
- clusterNetwork and serviceNetwork will be used internally for backend services, only change these if you are worried about the preset ones conflicting with your IP space.
- machineNetwork.cidr is the IP space your nodes will live on, this needs to be set for your DHCP network. This is the range the network will use. Some of the IPs below will need static reservations in your DHCP network, the worker and master nodes can have general pool DHCP addresses. We are assuming DHCP here, you can statically assign IPs but its more work and not something I am going to talk about right here.
- platform.baremetal.apiVIPs is where the API for your cluster will live, this is an additional IP the HA masters will hand back and forth to give the appearance of a single control plane.
- platform.baremetal.ingressVIPs is another IP that will be handed back and forth but will be the HTTPs front door for applications.
- agent-config.yaml, I will call out things you will want to change:
apiVersion: v1alpha1
kind: AgentConfig
rendezvousIP: 192.168.4.10
hosts:
  - hostname: hv1
    role: master
    rootDeviceHints:
      serialNumber: "AA22122369"
    interfaces:
      - name: enp1s0f0
        macAddress: 0c:c4:7b:1e:42:14
      - name: enp1s0f1
        macAddress: 0c:c4:7b:1e:42:15
    networkConfig:
      interfaces:
        - name: bond0.4
          type: vlan
          state: up
          vlan:
            base-iface: bond0
            id: 4
          ipv4:
            enabled: true
            address:
              - ip: 192.168.4.10
                prefix-length: 24
            dhcp: false
        - name: bond0
          type: bond
          state: up
          mac-address: 0c:c4:7b:1e:42:14
          ipv4:
            enabled: false
          ipv6:
            enabled: false
          link-aggregation:
            mode: 802.3ad
            options:
              miimon: "150"
            port:
              - enp1s0f0
              - enp1s0f1
      dns-resolver:
        config:
          server:
            - 192.168.3.5
      routes:
        config:
          - destination: 0.0.0.0/0
            next-hop-address: 192.168.4.1
            next-hop-interface: bond0.4
            table-id: 254
  - hostname: hv2
    role: master
    rootDeviceHints:
      serialNumber: "AA22628"
    interfaces:
      - name: enp1s0f0
        macAddress: 0c:c4:7b:1f:06:e2
      - name: enp1s0f1
        macAddress: 0c:c4:7b:1f:06:e3
    networkConfig:
      interfaces:
        - name: bond0.4
          type: vlan
          state: up
          vlan:
            base-iface: bond0
            id: 4
          ipv4:
            enabled: true
            address:
              - ip: 192.168.4.20
                prefix-length: 24
            dhcp: false
        - name: bond0
          type: bond
          state: up
          mac-address: 0c:c4:7b:1f:06:e2
          ipv4:
            enabled: false
          ipv6:
            enabled: false
          link-aggregation:
            mode: 802.3ad
            options:
              miimon: "150"
            port:
              - enp1s0f0
              - enp1s0f1
      dns-resolver:
        config:
          server:
            - 192.168.3.5
      routes:
        config:
          - destination: 0.0.0.0/0
            next-hop-address: 192.168.4.1
            next-hop-interface: bond0.4
            table-id: 254
  - hostname: hv3
    role: master
    rootDeviceHints:
      serialNumber: "203129F9D7"
    interfaces:
      - name: enp1s0f0
        macAddress: 0c:c4:7b:1f:03:c2
      - name: enp1s0f1
        macAddress: 0c:c4:7b:1f:03:c3
    networkConfig:
      interfaces:
        - name: bond0.4
          type: vlan
          state: up
          vlan:
            base-iface: bond0
            id: 4
          ipv4:
            enabled: true
            address:
              - ip: 192.168.4.30
                prefix-length: 24
            dhcp: false
        - name: bond0
          type: bond
          state: up
          mac-address: 0c:c4:7b:1f:03:c2
          ipv4:
            enabled: false
          ipv6:
            enabled: false
          link-aggregation:
            mode: 802.3ad
            options:
              miimon: "150"
            port:
              - enp1s0f0
              - enp1s0f1
      dns-resolver:
        config:
          server:
            - 192.168.3.5
      routes:
        config:
          - destination: 0.0.0.0/0
            next-hop-address: 192.168.4.1
            next-hop-interface: bond0.4
table-id: 254- rendezvousIP is an IP of a node in charge of the setup. You pick one of them to wait for all other masters/workers to be ready before starting the installation. It will wait for all nodes to be online, check they are ready, install them, then install itself.
- The rest of this config is a three times repeated (one per host) setup of each host, things you will want to change:
- hostname, whatever each hostname should be.
- rootDeviceHints.serialNumber, this is the serial number of the disk you want to install the OS onto. There are many different rootHints you can use depending on your setup. https://docs.redhat.com/en/documentation/openshift_container_platform/4.19/html/installing_an_on-premise_cluster_with_the_agent-based_installer/preparing-to-install-with-agent-based-installer#root-device-hints_preparing-to-install-with-agent-based-installer. To find the drive serial numbers, you can boot either a Redhat CoreOS image, or any Linux LiveCD, then run something like
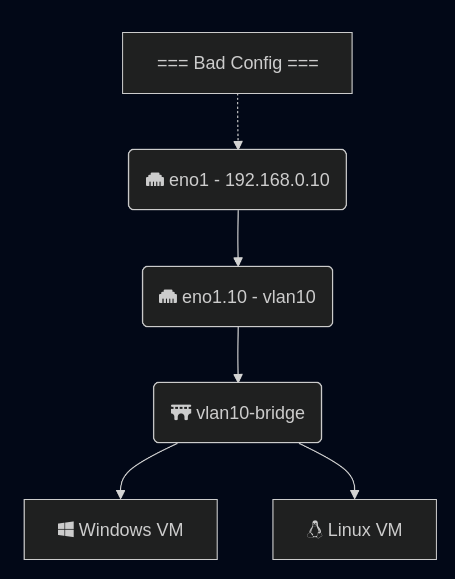
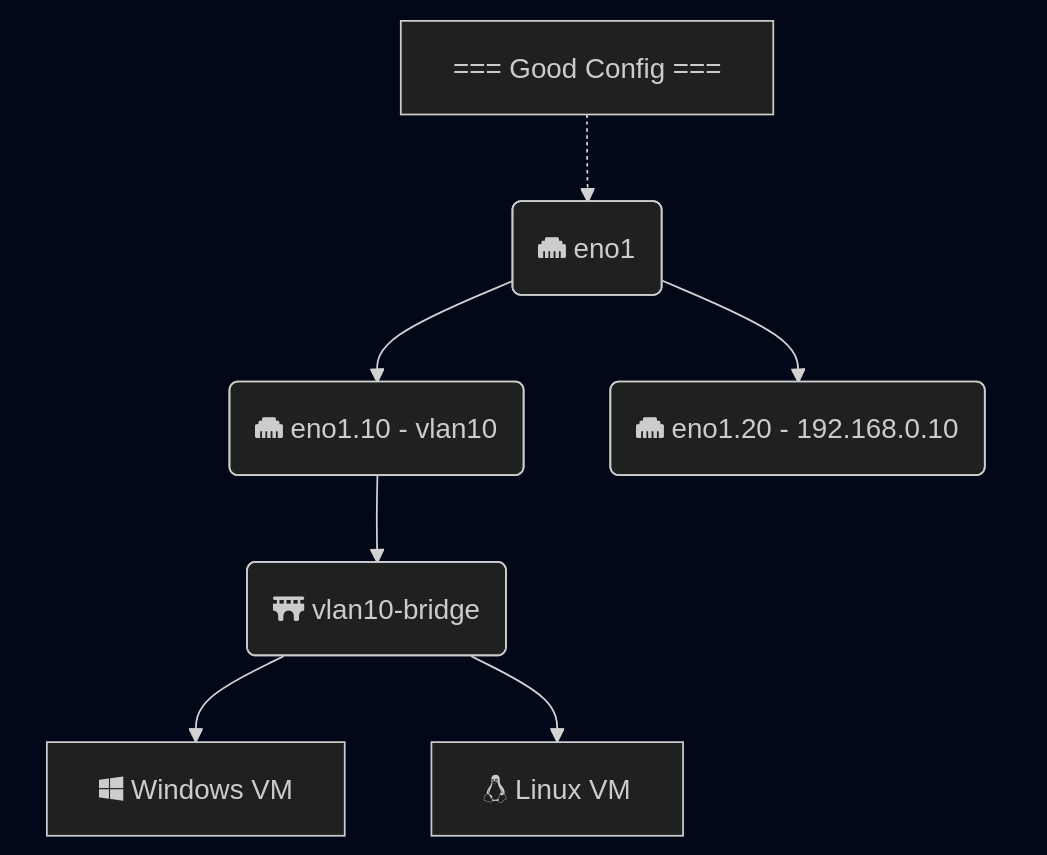
$ lsblk -o name,model,size,serial. - List interfaces with MAC addresses. I did here use port bonding and then subinterfacing the port bond for a vlan. That is a bit advanced and is not required. I do it this way so I can run a trunk port to each node, and then with VMs, run different VMs over different sub interfaces. The website above also has examples of networking without this port bond if you want a simpler config.
- DNS and core routes are the last thing to enter.
- DNS Entries: Having created those two files, you know what you want your DNS to be. It’s time to go into your location’s DNS servers and enter addresses just like in the original post. These entries can be made at any time before you start the installation. In the end you should have 1 IP for ingress, 1 for api, then one per node.
- api.cluster1.example.com -> apiVIPs, in my config 192.168.4.5
- api-int.cluster1.example.com -> apiVIPs, in my config 192.168.4.5
- *.apps.cluster1.example.com -> ingressVIPs, in my config 192.168.4.7
- master0.cluster1.example.com -> node1 IP, in my config hv1 so I put 192.168.4.10
- master1.cluster1.example.com -> node2 IP, in my config hv2 so I put 192.168.4.10
- …
- Image Creation:
- $ mkdir ocp
- $ cp *.yaml ocp
- $ ./openshift-install –dir ./ocp/ agent create image
- This will create a ocp/agent.x86_64.iso
- Installation: Boot that iso on all servers. The image will use the hardware you specified in agent-config.yaml and DNS lookups to identify each node. Make sure the systems NTP is working, and their time looks correct, then that each node can curl:
- registry.redhat.io
quay.io
cdn01.quay.io
api.openshift.com
access.redhat.com
- registry.redhat.io
- The stack should now install, the main server will show a screen saying the state of the other masters, and when they are all ready, it will proceed with install. This can easily take 30 minutes, and the screen on the rendezvous server can be slow to update.
With any luck you will have all the nodes reboot, and a running stack you can access at your console server location; here that would be console-openshift-console.apps.cluster1.example.com. Each node should show a normal Linux boot up sequence, then will show a login prompt, with that nodes name, and IP address(es). In this learning experience, feel free to restart the installation and the system will wipe the machines again.
In the ha-openshift folder, then the ocp subfolder there will be an auth folder. That will have the kubeadmin and kubeconfig files to authenticate to the cluster. The kubeadmin password can be used to login to oauth at console-openshift-console.apps.cluster1.example.com. The kubeconfig file can be used with the oc command downloaded from Redhat. using $ ./oc --kubeconfig ./ocp/auth/kubeconfig get nodes will show the nodes and their status from your installation machine.
Properly installed cluster example:
~/homelab_openshift $ ./oc --kubeconfig ./ocp/auth/kubeconfig get nodes
NAME   STATUS   ROLES                         AGE   VERSION
hv1    Ready    control-plane,master,worker   44d   v1.32.9
hv2    Ready    control-plane,master,worker   44d   v1.32.9
hv3    Ready    control-plane,master,worker   44d   v1.32.9
This is an example of a successfully upgraded cluster running, and I am running the standard OpenShift oc get nodes command. Note: the version is the version of Kubernetes being run, not OpenShift.
I will continue this series with posts about Networking, Storage, and VM setup for OpenShift.
Troubleshooting
The install process for OpenShift has a big learning curve. You can make it a bit easier by using Redhats web installer, but that also puts some requirements on the system that a Homelab usually can’t hit, doing the agent based installer bypasses those checks. Once you get your configs dialed in, I have found it easy to reinstall a stack, but getting configs for a stack setup correctly the first few times is tough. The installer also does not do a ton to make it easier on you, if something goes wrong, the biggest indicators I have found are: when SSHed into the installer, the memory usage, the journalctl logs in the installer, and about 8-10 minutes into a good install, you will see the DVD image start to read a lot of data, constant activity on the indicator for a few minutes (that is the CoreOS being written to the disk).
Random things to check in a failing install:
- SSH into a node using the SSH key in the install-config.yaml, run
$ sudo journalctland scroll to the bottom to see what’s going on, or just run$ sudo journalctl -f.- You may see something like:
- “failing to pull image”: It can’t hit Redhat, or your pull secret expired
- “ip-10-123-123-132.cluster.local node not recognized”: DNS entries need updated
- You may see something like:
- If the system successfully reboots after an install, but you are not seeing the console start, SSH into a node using the SSH key in the install-config.yaml, run
$ top. If your RAM usage is about:- 1GB, Kubernetes is failing to start, this could be a DNS or image download issue.
- around 8GB, the core systems are attempting to come online, but something is stopping them such as an issue with the api or apps DNS names.
- 12-16+GB of ram used, the system should be online.
- Worth repeating for those who haven’t used Openshift before, internal routing is done via DNS names in your request, if you attempt to go to the ingress VIP via the IP you will get “Application is not available”. This is good! Everything is up, you just need to navigate to the correct URL.
Footnotes
Helpful examples: https://gist.github.com/thikade/9210874f322e72fb9d7096851d509e35