Tutorial

Sonnet Labs, Sonnet One Unofficial Manual

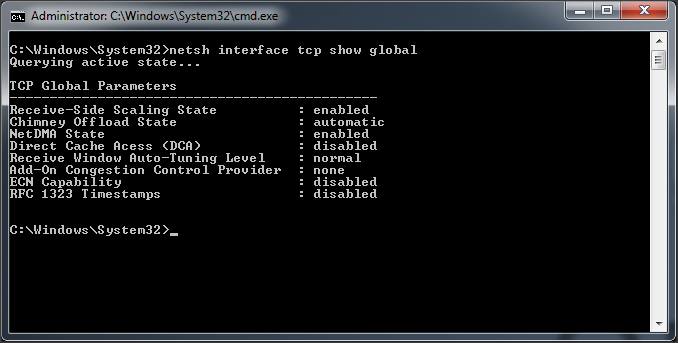
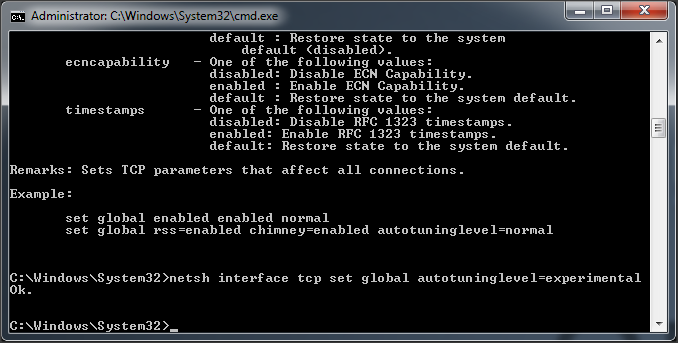
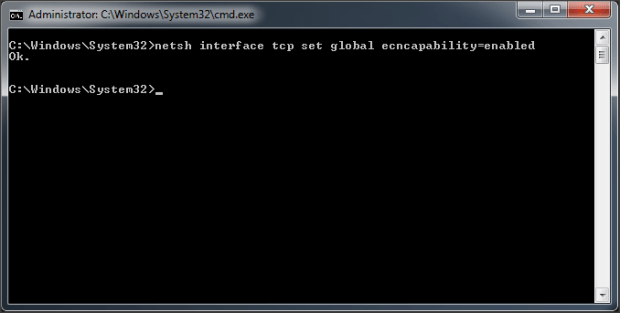
Today a device I forgot I ordered arrived, the Sonnet Labs One, a mesh point that reports to connect two places over lower frequency radio to allow large mesh networks. It works by getting one of the units and connecting it to your local wifi. Then the other one, according to the box can be up to 1ish miles in a city, and up to 10 miles out in the middle of no where. When I got it I unpacked it, and all that was in the box was the device, a micro USB cable, and a charger. Where are the instructions? I check the other (you need at least 2, or hope your town has some other people who got them years ago on Kickstarter or Indiegogo (yes they did both) ) and that also didn’t have instructions.

Ah the top of the box says sonnetlabs.com/start, perfect! 404 page not found, with a few other links, which also 404. Looking on the Indiegogo and Kickstart pages most people are still waiting for theirs, so I guess I am too early for the website? The sonnetlabs website also shows an early mockup of the device and nothing what it looks like now. I started digging through comments, and looking at their GitHub. I have pieced together some aspects of the device and figured I would start a manual since so far non exists. And at this point, the project seems to have maybe 1 or 2 people working to try to fulfill it. I would be happy to chat with the devs.

Turning on the device:

  • The first flag contains a port for an antenna, the second has the micro USB charging port, and a micro SD card slot, the last has a USB host port to charge your devices.
  • Plug in the included charger into the middle micro USB port
  • Hold the Orange button for about 3 seconds and a green light should appear on the top of the unit

Connecting to the device, and to the internet:

  • When the unit is on, you should see a new Wifi network near by, Sonnet-XXXX connect to this with the password of “sonneteer”
    • Note: I had issues with my Mac doing this and had to manually enter the credentials
  • The web server that hosts the app takes a minute to start, if you try to go to it too fast it will fail to load
  • In a browser go to https://app.sonnetlabs.com, the IP is usually 192.168.47.1; but if you go to the IP the settings menu seemed total for me, it looks like they hard coded that URL in some locations
  • There will be an error about the certificate, this is because the device made it, accept to continue, you may have to hit “Details” or “Advanced”
  • You should see the login screen, click “Register New User”
    • This makes a user to send messages, and use the basic aspects of the device, fun fact all this data is stored locally in your browser, so the users generally don’t matter. This does secure your chat message data, because you need to use that exact browser and that exact device to ever see these messages again. If you change the address you are going to, or the browser, or anything you need to go re-register a user.
    • The Administrative password, set later, does actually store on the device and persist
  • Put in a name, username, and password
  • Once you see “Registration Successful” go back to the login screen and login
    • Note: Hitting the “Enter” key on the password field doesn’t trigger a login, you need to click “login” (at least in Firefox)
  • Now you are at the default page, “Contacts”, go to the “Settings Page”
  • At the bottom of the “Settings” page it will say “Set New Password” and “New password”, you have to put something in here to get Admin access to the device, that isn’t clear, but it is needed. This is saved to the device.
    • Note: This password is entered later in the UI and is just displayed on your screen, don’t make it something you don’t want people to see
  • Once you set a password there, you will get a real “Admin” page
  • Here you can click “Wifi” and start the process to connect to your own wifi network
  • This took a minute, then mine displayed a green check mark and I could connect to the internet, through my internet, even though I was bouncing through the device
  • Note at this time, I have gotten the two devices to use the “Chat” function, but not the mesh internet functions

Using Chat:

I was able to get chat to work between two of the devices, setting up one, then turning the other one seems to auto pair them. At this time I can not find any user interface on how to confirm/configure/see anything about the mesh. But Chat worked… so that’s something.

  • Login to the web interface
  • Go to “Contacts” on BOTH devices
  • Click the + in the top right
  • Select “From Network”
  • If both sessions are online, you should see the other user
  • Then if you can, you can click there name and this will send a request to add
  • On the second device, there should be a red dot on the + in the top right of “Contacts” screen, go to the +
  • Select “Requests” and approve the request
  • Then you can chat, I haven’t done much testing on how much caching of messages the devices do, but in my first test one device missed a message because the window timed out and was “offline” again
  • Note: If you see “Offline” as a bar at the top of the Window, your browser has disconnected from the device itself, clicking “Offline” should reconnect

I have not gotten QR codes to work, even with a very clear photo.

I took some screen shots of other screens. If you want more info, or have more info please leave a comment!

Additional Info:

I found a bunch of info poking around online, here are some notes:

Github for the app the device runs, but an OLD build: https://github.com/SonnetLabs/sonnet-webapp/

People talking about the device: https://community.gotennamesh.com/t/sonnet-devices-beta/4328/22

From what I can tell at the address above, a user states he was working with the devs and got SSH access to the device. I believe the image he had was a dev build with SSH installed, and the normal image we all have on the production units have this disabled.

The creators posted a early draft of a manual a while ago, copy below for archiving: https://www.dropbox.com/s/avmes7rhanx2vli/Sonnet%20User%20Manual%20v0.4.pdf

The FCC registered manual, very light: https://fccid.io/2AN8Z-SONNET/Users-Manual/user-manual-4003660

And the last laugh, there is a subdomain under sonnetlabs.com that the Digital Ocean server now belongs to someone else, so hilariously redirects. I give you lithium.sonnetlabs.com

Super Conduit

Due to the high latency of the lines between my works offices, file transfers can be slow. There are settings in Windows Vista+ systems that can allow the TCP window to grow, and allow much higher utilization on these lines. I call it Super Conduit. This may be possible on *nix systems, but the way this tweak works is that it tells the other side it will be doing this tweak. That means that both sides have to be at least Windows Vista Kernel, (Server 2008 works) that also means that linux file servers will not work because them seem to be linux machines with SMB. This should be done over wired connections, because the packet loss on wireless hurts these connections more than anything else.

With the “autotuninglevel” change, I have seen speed changes from a 1megabit a second line go to 150-200 megabits a second.

WARNING: Windows Vista/7 IP stack can not handle changing this setting and using normal connections, meaning once this is done usually the internet stops working until the setting is reversed. Windows 8+ seems to have no problems with this setting, and the internet; it just makes Win 8/8.1 more awesome than it already is, which is pretty awesome.

  1. Login under a administrator account to the Windows machine
  2. Open ‘cmd’ as a administrator
    1. Title bar should be “Administrator: C:\Windows\System32\cmd.exe”
  3. “netsh interface tcp show global” will show the current settings of your machine
    1. Command Line Status
  4. “netsh interface tcp set global autotuninglevel=experimental” enables the majority of what you need for faster transfers, all you will get back in response is “Ok.”
    1. Image2
  5. Another setting I have used in the past is “netsh interface tcp set global ecncapability=enabled” this adds a flag to the packs that tells routers “I dont care if I get slowed down, please dont drop me completely”. The problem you run into with large TCP windowing is one dropped lowers the TCP window size a lot and slows the connection making it a lot more spiky. This command doesnt always help, but setting it hasnt hurt in the past.
    1. Image3
  6. The “rss” receive-side scaling state should be set to enabled, that should be the default. This allows the receiver to do these types of conenctions.
  7. When you are done your transfer just run “netsh interface tcp set global autotuninglevel=normal”


Troubleshooting Notes:

Windows 7 seems to act oddly when starting to use this setting, so I would enable it then restart the machine. I believe that cached sessions already in progress do not take the new setting.


YAY MATH:

http://bradhedlund.com/2008/12/19/how-to-calculate-tcp-throughput-for-long-distance-links/

Default window size: 65536 bytes * 8 = 524288 bits

73ms latency between cross country offices, 524288 bits / 0.073 seconds = 7,182,027 Bits throughput, theoretically. 897,753 B/s, max.

This setting increases that window size to something larger, much larger, and thus gives better speeds. The only interesting downside is that since the TCP window is big, if a packet is then lost, TCP resizes the window to a much smaller setting; forcing the window to climb again.

That is a 1GB link going across the country.

That is a 1GB link going across the country.

WQL, SQL Queries for Windows Backend (Part 1)

If you have been writing web apps for a while, or other apps you more than likely have used SQL. SQL allows you to query a database and interact with your applications data. Instead of trying to find a users profile, what if we wanted to find out what a user was printing on their local machine? If there was an easy interface for that, it could make programming for a platform like Windows a lot easier. Well Microsoft years ago added this ability to Windows; the technology is called WQL. This was added with the other components of WMI (Windows Management Instrumentation) at Windows ME. For Windows 9x and NT you can download the WMI core. This article will be a brief over view of what it can do and how you can play around with it.

First like when we looked at LDAP, we want a tool that will let us quickly play around with what is available, and then code that into our application. The tool I use is WMI Explorer, http://www.ks-soft.net/hostmon.eng/wmi/, it provides a easy interface to look at all the data available. With the WMI core it works with everything back to Windows 95! You can download and run the program for free, no installation required. Once open, there is a upper portion of the window that lists all the spaces you can access, these would be the ‘tables’ in SQL. Depending on your version of Windows, there will be separate options available. I have used this interface before for network cards (6to4 Cleaner) and printers.

WMI Explorer

WMI Explorer

For this example I will go over to the Win32 framework and access the Win32_Printer ‘table’. I get a list of printers the machine has installed, as well as attributes to each of these printers. Any administrator, or any program attempting to manager printers (I say attempting because printers can he a horrible experience) information – like what port the printer is using – is here, in addition what type of connection this machine has to the printer. At the bottom of the Window there is a Query that is building as you select different fields. This query can be moved into a application later to get the same data in code. WMI Explorer also allows for a user to write Queries directly without this interface; that is the second tab at the top of the window.

One downside I have found in using WMI is the setup process time, in C#/.NET using WMI is easy, but it takes time to start accepting queries. About a year or two ago I was working on querying network card information on Windows Vista. The first call could take a few seconds to respond, after that first call it would speed up, this is just something that has to be accounted for in the applications design. I found running WQL queries in a separate process, and starting them as soon as possible would allow the process to finish before the user needed the data.

I just wanted to get everyone started looking at what is available, in a later article I will go into more depth about programming with this and how you can interact with this data in a C#/.NET program.

Combining CAS and LDAP

After going over CAS and LDAP, I thought I would do an example where both are used together. I have some software like this, it allows users to log in and then LDAP can go and get their full name. The example is mostly the CAS example with some LDAP added on. All I did was add on the LDAP code into the section where a user is logged into CAS. I use CAS to get the username of the user and feed it into LDAP. Below is the new index of the CAS example, nothing else is changed:

<?PHP
//Dan Berkowitz LDAP tutorial, May 2013, Buildingtents.com

include_once(“./CAS-1.3.2/CAS.php”);
phpCAS::client(CAS_VERSION_2_0,’cas-auth.rpi.edu’,443,’/cas/’);
// SSL!
phpCAS::setCasServerCACert(“./CACert.pem”);//this is relative to the cas client.php file

if (phpCAS::isAuthenticated())
{

$LDAPCON = ldap_connect(“ldap.rpi.edu”); //Have to be internal to VCC or VCC firewall will block
$LDAPBIND = ldap_bind($LDAPCON);
$ResultArray = Array();
$filterArray = array(“givenname”, “sn”);
$LDAPSEARCH = ldap_search($LDAPCON, “dc=rpi, dc=edu”, “(uid=” . phpCAS::getUser() . “)”, $filterArray, 0 , 10);
$LDAPRESULTS = ldap_get_entries($LDAPCON, $LDAPSEARCH);
//print_r($LDAPRESULTS);
for ($i = 0; $i < $LDAPRESULTS[“count”]; $i++)
{
$tempRow = Array();
array_push($tempRow, $LDAPRESULTS[$i][“givenname”][0]);
array_push($tempRow, $LDAPRESULTS[$i][“sn”][0]);
array_push($ResultArray, $tempRow);
}
ldap_close($LDAPCON);

echo “User:” . phpCAS::getUser();
if (sizeof($ResultArray) == 1)
{
echo ” ” . $ResultArray[0][0] . ” ” . $ResultArray[0][1];
}
echo “<a href=’./logout.php’>Logout</a>”;
}else{
echo “<a href=’./login.php’>Login</a>”;
}

?>

Download: https://github.com/daberkow/daberkow.github.io/blob/master/CASExample.zip

LDAP Authentication RPI Tutorial (Part 3)

Now that we have gone over how to setup LDAP, and went into some more depth about how to search using it, we will now look at actually writing a web page in PHP that uses LDAP. As always, I will be using RPI as my example but this should work for anyone with an LDAP system. (Note to people at RPI, you need to VPN in unless you are in the VCC for this to work, I have had luck with doing this in Lally, but in the Union it failed) The first example will go over how to just use LDAP to return information; the second one will incorporate the CAS example that was done before, and search for the user that logs in, this will be put out in a few days. The LDAP servers I am using do not require authentication, if the one you are using does then you will need to go to http://www.php.net/manual/en/function.ldap-bind.php and look at using authentication on your bind command.

  1. Within a new PHP document, enter the following line with ‘ldap.rpi.edu’ replaced with your LDAP server. The variable can be named anything as long as you remember it is for the connection.
    • “$LDAPCON = ldap_connect(‘ldap.rpi.edu’);”
  2. Now we have to bind to the server, this is when credentials are given (if needed) and we fully connect. If the server is unreachable, or you are not permitted to connect this is where PHP will throw an error. As you can see, we create a new variable for the binding, and feed in our connection variable.
    • “$LDAPBIND = ldap_bind($LDAPCON);”
  3. We have seen before that LDAP can return vast amounts of information on a single item, and since many servers have a limit on how much they will return it is good practice to filter for just what we want back. Here I will be requesting the “givenname” and “sn” for each user. These items must be put into an array like shown.
    • “$filterArray = array(‘givenname’,’sn’);”
  4. The core of the search is the search command. Here we give all the different compounds we have made and put them together. First, we enter the connection to use; second, we enter the base for the search (described in part 1&2). Following that we enter a filter for how we want to search the directory, this is not the filter we setup one step ago but a filter to tell the central LDAP what we are looking for. I am searching for anyone with a UID that starts with ‘berkod’. Then we enter the filter we setup earlier for the types of data we want returned. The last two settings are setup per instance; start with a 0 or 1 for attributes only filter, 0 means return the full data, 1 means that you just want the type returned if data exists (this is for more of a fast exploratory search). To end the command you enter the number of results that should be returned; 0 is no limit, yet I am hoping to search usernames and get 1 result. I entered 10 just so if more than 1 user exists under my filter I will know.
    • $LDAPSEARCH = ldap_search($LDAPCON, “dc=rpi, dc=edu”, “(uid=berkod*)”, $filterArray, 0 , 10);
  5. The results from the search have to be stored in a separate variable
    • $LDAPRESULTS = ldap_get_entries($LDAPCON, $LDAPSEARCH);
  6. Now for a quick and dirty view of the result you can simply print out the data
    • “print_r($LDAPRESULTS);”
  7. But that just lets you quickly see if you are getting data back, to properly put the data into an array use the following code. This will get the two pieces we requested for each user (“givenname” and “sn”) and store them in an array; then put that array into another array. The final format is $variable[$user][0 for ‘givenname’/ 1 for ‘sn’]. This data can be used by other code or printed out.
    • $ResultArray = Array();
      for ($i = 0; $i < $LDAPRESULTS[“count”]; $i++)
              {
                  $tempRow = Array();
                  array_push($tempRow, $LDAPRESULTS[$i][“givenname”][0]); // 0 is used because my database just has one item per user
                  array_push($tempRow, $LDAPRESULTS[$i][“sn”][0]);
                  array_push($ResultArray, $tempRow);
              }
  8. Then for good practice close the LDAP connection
    • “ldap_close($LDAPCON);”

The next post will go over combining CAS and LDAP. Until then thanks for commenting and feel free to ask questions.

References:

http://www.php.net/manual/en/function.ldap-search.php

LDAP Authentication RPI Tutorial (Part 2)

Last time I spoke of how to setup ldap with PHP and briefly touched on using the “ldapsearch” command. I would like to go more in-depth on “ldapsearch”, and show you how you can use it to craft searches for your PHP application. Specifically for RPI, if the user has a RCS account, they can ssh into “rcs-ibm.rpi.edu” and run the following commands. (RCS-IBM puts you on either clark.server.rpi.edu or lewis.server.rpi.edu, these two have the commands you need on them and run AIX) To briefly review the command:

  • First we add the command, then enter the host you are searching, tell the server to try simple anonymous authentication. Next give the server a base to start the search (I am using RPI specific domain components), finally we have to give the heart of our search. I am looking for any Unique ID (username) that starts with “berk”, and ends with anything “*”.
  • ldapsearch -h ‘ldap.rpi.edu’ -x -b ‘dc=rpi, dc=edu’ ‘uid=berk*’”

The main part of the search we will be editing is the ending. Here we specify a filter to find the information we are attempting to access. Each LDAP server has different attributes it can give about each object. For example, the ldap.rpi.edu server gives out “givenName, objectClass, cn(full concatenated name, or common name), sn (surname), loginShell,” and many others; while at the same time “ldap1.server.rpi.edu” returns a much different lists of results.

Finding Which Attributes Will be Returned

The best way to find which fields are available is by doing a search without a filter. Just running the search below will return an unfiltered list of everything in the directory, up till you hit the individual servers limit. I am purposefully not publishing results from these searches for privacy reasons; here is some results for me with some data omitted.

  • “ldapsearch -h ‘ldap.rpi.edu’ -x -b ‘dc=rpi, dc=edu’”
  • # berkod2, accounts, rpi, edu
    dn: uid=berkod2,ou=accounts,dc=rpi,dc=edu
    sn: Berkowitz
    cn: Berkowitz, Daniel
    objectClass: top
    objectClass: posixAccount
    objectClass: inetOrgPerson
    objectClass: eduPerson
    objectClass: rpiDirent
    objectClass: mailRecipient
    objectClass: organizationalPerson
    objectClass: person
    uid: berkod2
    loginShell: /bin/bash
    uidNumber: #####
    mailAlternateAddress: berkod2@rpi.edu
    givenName: Daniel
    gecos: Daniel  Berkowitz
    rpiclusterhomedir: /home/berkod2
    description: PRIMARY-STU
    homeDirectory: /home/06/berkod2
    gidNumber: ###

Now that we have an idea about the data structure and what this server has on it we can reverse the lookup and tweak it. I know ‘uid’ will be the username, and I can get the users name from that! So using CAS I can log a user in and get their username, then I can lookup there LDAP information. (EXAMPLE 1) If a user enters a name, then a user can search for their UID doing the reverse. (EXAMPLE 2) The wild card can also be used if the full name is not known. (EXAMPLE 3) Last we can use multiple fields, combining these ideas to narrow down the result. (Example 4)

  • Example 1
    • “ldapsearch -h ‘ldap.rpi.edu’ -x -b ‘dc=rpi, dc=edu’ ‘uid=berkod2’”
  • Example 2
    • “ldapsearch -h ‘ldap.rpi.edu’ -x -b ‘dc=rpi, dc=edu’ ‘sn=Berkowitz’”
  • Example 3
    • “ldapsearch -h ‘ldap.rpi.edu’ -x -b ‘dc=rpi, dc=edu’ ‘sn=Berko*’”
  • Example 4
    • “ldapsearch -h ‘ldap.rpi.edu’ -x -b ‘dc=rpi, dc=edu’ ‘sn=Berko*’ ‘uid=berkod*'”

LDAP Authentication RPI Tutorial (Part 1)

After writing about how to use CAS with PHP, I thought I would write a post about how to use LDAP(Lightweight Directory Access Protocol) at RPI but these methods can be used anywhere. LDAP is a protocol to query user databases, this is a protocol that can be sed along with Active Directory, or another directory system for computers and user accounts. This protocol is widely used to allow different applications to interact with your user database. Here I will be showing how to implement search with LDAP to a web application. This guide will be using LDAP with PHP, this requires the LDAP module to be enabled within PHP; that will be the purpose of this article, then the next one will discuss how to actually query LDAP.

LDAP Linux (Debian/Ubuntu) Install

Linux is easy to get LDAP working with PHP, as long as you have a standard installation of Apache, with PHP 5 working.

  1. Install the LDAP module onto the machine, using either aptitude or apt-get
    • “sudo aptitude install php5-ldap”
    • OR “sudo apt-get install php5-ldap”
  2. PHP should now be able to use LDAP, if it is not working yet, you will need to restart Apache.
    • “sudo service apache2 restart”

LDAP Windows (XAMPP) Install

Xampp for Windows comes with LDAP, but there is a bug in their implementation and a file needs to be copied before LDAP will work. I am going to use “C:\xampp”, the default directory for Xampp in this example.

  1. Go into the PHP folder, C:\xampp\php\
  2. Edit the file “php.ini” with any text editor
  3. Find the line “;extension=php_ldap.dll”, and remove the semi-colon. “extension=php_ldap.dll”
  4. Now if you were to reboot Apache it should be working, but its not! Why not? There is a missing DLL. You need to
    copy libsasl.dll from c:\xampp\php\libsasl.dll to C:\xampp\apache\bin\.
  5. Now restart Apache

LDAP Search

Now that PHP can search LDAP we are going to want to start creating queries in PHP; but it is much easier to tweak the search in the command line, and then put that query into PHP. The following are steps that can be taken on a Linux computer (again Ubuntu/Debian) to install and use a ldap command line search.

  1. First we need to install the OpenLDAP utilities that will give us the “ldapsearch” command
    • “sudo aptitude install openldap-utils”
    • OR “sudo apt-get install openldap-utils”
  2. Now we are making our query
    • First we add the command, then enter the host you are searching, tell the server to try simple anonymous authentication. Next give the server a base to start the search (I am using RPI specific domain components), finally we have to give the heart of our search. I am looking for any Unique ID (username) that starts with “berk”, and ends with anything “*”.
    • ldapsearch -h “ldap.rpi.edu” -x -b “dc=rpi, dc=edu” “uid=berk*”
    • Now this gives one result, and this can be used to see what data will be returned from this server. You can also try “ldap1.server.rpi.edu” this returns a entirely different list of variables, and sometimes more users.
    • If you are interested in researching this command more, die.net has a great resource. http://linux.die.net/man/1/ldapsearch
    • Troubleshooting: For those of you here at RPI trying to follow this guide specifically, if you do not get any results or a error connecting, RPI firewalls the LDAP servers heavily. I have found a lot of the time I have to be in the VCC to make this work, you can also VPN in, then your network connection is within the VCC and it will work. I have VPNed in, while on campus in the Union to get LDAP to work.

UPDATE: I added a little about what LDAP is

RPI phpCAS Authentication Tutorial

After much tinkering with RPI’s CAS (Central Authentication System) in PHP, I thought I would put together a guide to make it easy for anyone to put together a site that uses it. This would work for anyone at another location with a CAS server, but this example is for RPI.

  1. Get the CAS Library
  2. Download the tar file under “Current Version”
  3. Extract the contents, using a program such as 7-Zip, and put it in the root of whatever web folder you want
  4. Download the latest CA bundle for SSL
  5. Create a index.php, login.php, logout.php
  6. The index has to load the library, check if the user is logged in, then print out text.
    • <?PHP

      include_once(“./CAS-1.3.2/CAS.php”);
      phpCAS::client(CAS_VERSION_2_0,’cas-auth.rpi.edu’,443,’/cas/’);
      // SSL!
      phpCAS::setCasServerCACert(“./CACert.pem”);//this is relative to the cas client.php file

      if (phpCAS::isAuthenticated())
      {
      echo “User:” . phpCAS::getUser();
      echo “<a href=’./logout.php’>Logout</a>”;
      }else{
      echo “<a href=’./login.php’>Login</a>”;
      }

      ?>


    • First we load the library for CAS from the subfolder
    • Then we select which will be our central server
    • We have to select our ca bundle, setCasServerCert does this
    • Now we have fully loaded and configured the library
    • Finally, I can ask CAS if a user has logged in, if so writeout some options, if not others
  7. This is the login page
    • <?PHP

      include_once(“./CAS-1.3.2/CAS.php”);
      phpCAS::client(CAS_VERSION_2_0,’cas-auth.rpi.edu’,443,’/cas/’);
      // SSL!
      phpCAS::setCasServerCACert(“./CACert.pem”);//this is relative to the cas client.php file

      if (!phpCAS::isAuthenticated())
      {
      phpCAS::forceAuthentication();
      }else{
      header(‘location: ./index.php’);
      }

      ?>


    • Similar setup of authentication as before
    • Now we check if the user is NOT authenticated, if the user is not authenticated we force login
    • If the user already is logged in, then we redirect to the index
  8. The logout page:
    • <?PHP

      include_once(“./CAS-1.3.2/CAS.php”);
      phpCAS::client(CAS_VERSION_2_0,’cas-auth.rpi.edu’,443,’/cas/’);
      // SSL!
      phpCAS::setCasServerCACert(“./CACert.pem”);//this is relative to the cas client.php file

      if (phpCAS::isAuthenticated())
      {
      phpCAS::logout();
      }else{
      header(‘location: ./index.php’);
      }

      ?>


    • Same configuration (this can be done by including a core file that everything else calls, but for this example I wanted to keep it simple)
    • If they are not logged in, then we push the user back to login

That is the basic configuration, the example is available for download below. If there are any questions feel free to post a comment.

Download: https://github.com/daberkow/daberkow.github.io/blob/master/CASExample.zip

Extra Notes:

  • If you want to save server space, the docs folder under the CAS folder can be removed
  • I have ran into problems with CAS on a Windows Apache server, and CAS on a Linux Apache server reference the CACert.pem file differently