We have set up our OpenShift system, more than likely using HA if you are interested in Ceph, it’s time to get the storage online. You can do a SNO setup, then add additional workers. Or even you can do one system, with Ceph running storage… for some reason…
A very quick brief on Ceph. Ceph is an open-source shared storage system. It is comparable to VMware vSAN. Ceph has many knobs you can tune for performance. Once set up, you have several options for storage. You can do file-layer, POSIX-compatible storage (CephFS) that lets pods access files in a shared folder; S3 storage (RGW) that pods connect to over an HTTP endpoint; or block storage (RBD). For VMs we will be focusing on block storage. These will be our virtual disks. Since this is networked storage, you will want a fast interconnect between nodes, usually a minimum of 10gb/s. Depending on your disks and traffic, you can easily saturate your network here. Having a dedicated network for your nodes to talk over, and/or overprovisioning can help. After a node reboots, Ceph will resync whatever has changed while it was offline and compare itself to other cluster members. This will go as fast as your storage will let it.
When using OpenShift and wanting Ceph, you have two options. You can run the officially supported Red Hat OpenShift Data Foundation. This is a nicer version of Ceph that has a clean interface you can add as a plugin within OpenShift. The downside is it wants a ton of resources and is a licensed product. The other large downside is the requirements; it WILL NOT ALLOW YOU TO INSTALL without 30 CPUs (a Kubernetes measurement) and 72GB of RAM available across your nodes. For a home lab, that’s probably too much.
The alternative is Rook. Rook is a Kubernetes wrapper around Ceph and gives you controls for running Ceph within Kubernetes. This is what I will be discussing deploying. Rook is a project of the Cloud Native Computing Foundation and has lots of support. There is a getting started guide specifically for OpenShift, OpenShift – Rook Ceph Documentation, but I think it’s written more for people with experience.
Installing Rook
Since this is a generic open-source project and not an OpenShift-specific one, this installation will be oc-command heavy.
Note: OpenShift marks your installation disk as not available, Ceph will attempt to use any other disks in your hosts. If you have data on disks you do not want to lose, remove those disks. There is a chance Ceph will see the data and refuse to use the disk until you erase it. In that case, if Ceph does not grab your disk, I dd zeros to the first few MB of the drive, and then it will see it as blank.
git clone https://github.com/rook/rook.gitto a workstation which has theoccommands present.oc create namespace rook-cephoc apply -f ./rook/deploy/examples/crds.yaml -f ./rook/deploy/examples/common.yaml- These are low level prereqs for Rook
oc apply -f ./rook/deploy/examples/csi-operator.yamloc apply -f ./rook/deploy/examples/operator-openshift.yamloc apply -f ./rook/deploy/examples/cluster.yaml
- # Wait for pods to come up
- oc -n rook-ceph get service
The system should start grabbing disks and you will see a bunch of OSD pods come online. Each hard drive gets an OSD pod that will be in charge of it. This is replicated, distributed storage; if it says you have 10TB, and you have replication of 2 on, then you will only be able to store 5TB of actual data.
With the backend initializing, we need to do some configuration. We will start with the block storage that is our main use case.
1_configure_pool.yaml
apiVersion: ceph.rook.io/v1kind: CephBlockPoolmetadata: name: cephblockpool namespace: rook-cephspec: failureDomain: host replicated: size: 2
oc apply -f 1_configure_pool.yaml
Note here I am saying keep 2 copies of each block of data in our ceph block pool and make sure they are stored on different hosts. You can set this higher to keep 3 copies or live on the edge with 1. If you are running SNO: set failureDomain: osd (or size: 1), or the system will not be able to start. I am running 3 nodes, so I purposefully set my replica size for block data to 2, and metadata above to 3. Block storage tends to be large; keeping only 2 copies allows for a backup and for use when a cluster node is rebooting for updates.
2_configure_ceph_block.yaml
apiVersion: storage.k8s.io/v1kind: StorageClassmetadata: name: rook-ceph-blockprovisioner: rook-ceph.rbd.csi.ceph.comparameters: clusterID: rook-ceph pool: cephblockpool imageFormat: "2" imageFeatures: layering csi.storage.k8s.io/provisioner-secret-name: rook-csi-rbd-provisioner csi.storage.k8s.io/provisioner-secret-namespace: rook-ceph csi.storage.k8s.io/controller-expand-secret-name: rook-csi-rbd-provisioner csi.storage.k8s.io/controller-expand-secret-namespace: rook-ceph csi.storage.k8s.io/node-stage-secret-name: rook-csi-rbd-node csi.storage.k8s.io/node-stage-secret-namespace: rook-cephreclaimPolicy: DeleteallowVolumeExpansion: true
oc apply -f 2_configure_ceph_block.yaml
If you want to make this your default storage run:
oc patch storageclass rook-ceph-block -p '{"metadata":{"annotations":{"storageclass.kubernetes.io/is-default-class":"true"}}}'
Now that we have our block storage configured, you may want CephFS also. It’s a shared folder where applications within OpenShift can mount and share files. This is file-based like a NAS. Whereas the block storage is block-based like a SAN.
3_configure_cephfs.yaml
apiVersion: ceph.rook.io/v1kind: CephFilesystemmetadata: name: cephfspool namespace: rook-cephspec: metadataPool: replicated: size: 3 requireSafeReplicaSize: false dataPools: - name: replicated replicated: size: 3 requireSafeReplicaSize: false compressionMode: none preserveFilesystemOnDelete: false metadataServer: activeCount: 3 activeStandby: false
oc apply -f 3_configure_cephfs.yaml
4_configure_ceph_storage_class.yaml
apiVersion: storage.k8s.io/v1kind: StorageClassmetadata: name: rook-cephfsprovisioner: rook-ceph.cephfs.csi.ceph.comallowVolumeExpansion: trueparameters: clusterID: rook-ceph fsName: cephfspool pool: cephfspool-replicated csi.storage.k8s.io/provisioner-secret-name: rook-csi-cephfs-provisioner csi.storage.k8s.io/provisioner-secret-namespace: rook-ceph csi.storage.k8s.io/controller-expand-secret-name: rook-csi-cephfs-provisioner csi.storage.k8s.io/controller-expand-secret-namespace: rook-ceph csi.storage.k8s.io/node-stage-secret-name: rook-csi-cephfs-node csi.storage.k8s.io/node-stage-secret-namespace: rook-cephreclaimPolicy: Delete
oc apply -f 4_configure_ceph_storage_class.yaml
For VMs and wanting to snapshot I added:
oc apply -f rook/deploy/examples/csi/rbd/snapshotclass.yaml
oc create -f rook/deploy/examples/csi/cephfs/snapshotclass.yaml
The last thing I would add, this is optional but makes life easier, is the web dashboard for Ceph.
oc -n rook-ceph edit cephcluster will pop up a text editor, then add
spec: dashboard: enabled: true ssl: true
That will start the dashboard on a node, but you may want to access it from outside the cluster itself:
oc apply -f ./rook/deploy/examples/dashboard-external-https.yaml
That exposes it on all nodes; you can then run the following to get the port number:
oc get services -n rook-ceph
NAME                                     TYPE           CLUSTER-IP       EXTERNAL-IP   PORT(S)             AGE
rook-ceph-exporter                       ClusterIP      172.30.120.33    <none>        9926/TCP            229d
rook-ceph-mgr                            ClusterIP      172.30.52.78     <none>        9283/TCP            229d
rook-ceph-mgr-dashboard                  ClusterIP      172.30.238.190   <none>        8443/TCP            229d
rook-ceph-mgr-dashboard-external-https   NodePort       172.30.254.103   <none>        8443:32088/TCP      229d
rook-ceph-mon-a                          ClusterIP      172.30.58.172    <none>        6789/TCP,3300/TCP   229d
rook-ceph-mon-b                          ClusterIP      172.30.10.72     <none>        6789/TCP,3300/TCP   229d
rook-ceph-mon-c                          ClusterIP      172.30.164.174   <none>        6789/TCP,3300/TCP   229d
In this example, that “32088” is the port we connect on. You will need to get the admin password as a secret within the cluster, and you will need to base64 decode it, on Linux / Mac:
oc -n rook-ceph get secret rook-ceph-dashboard-password -o jsonpath="{['data']['password']}" | base64 --decode
On Windows:
oc -n rook-ceph get secret rook-ceph-dashboard-password -o jsonpath="{['data']['password']}"
[System.Text.Encoding]::UTF8.GetString([System.Convert]::FromBase64String("mylittlestringfromfirststep="))
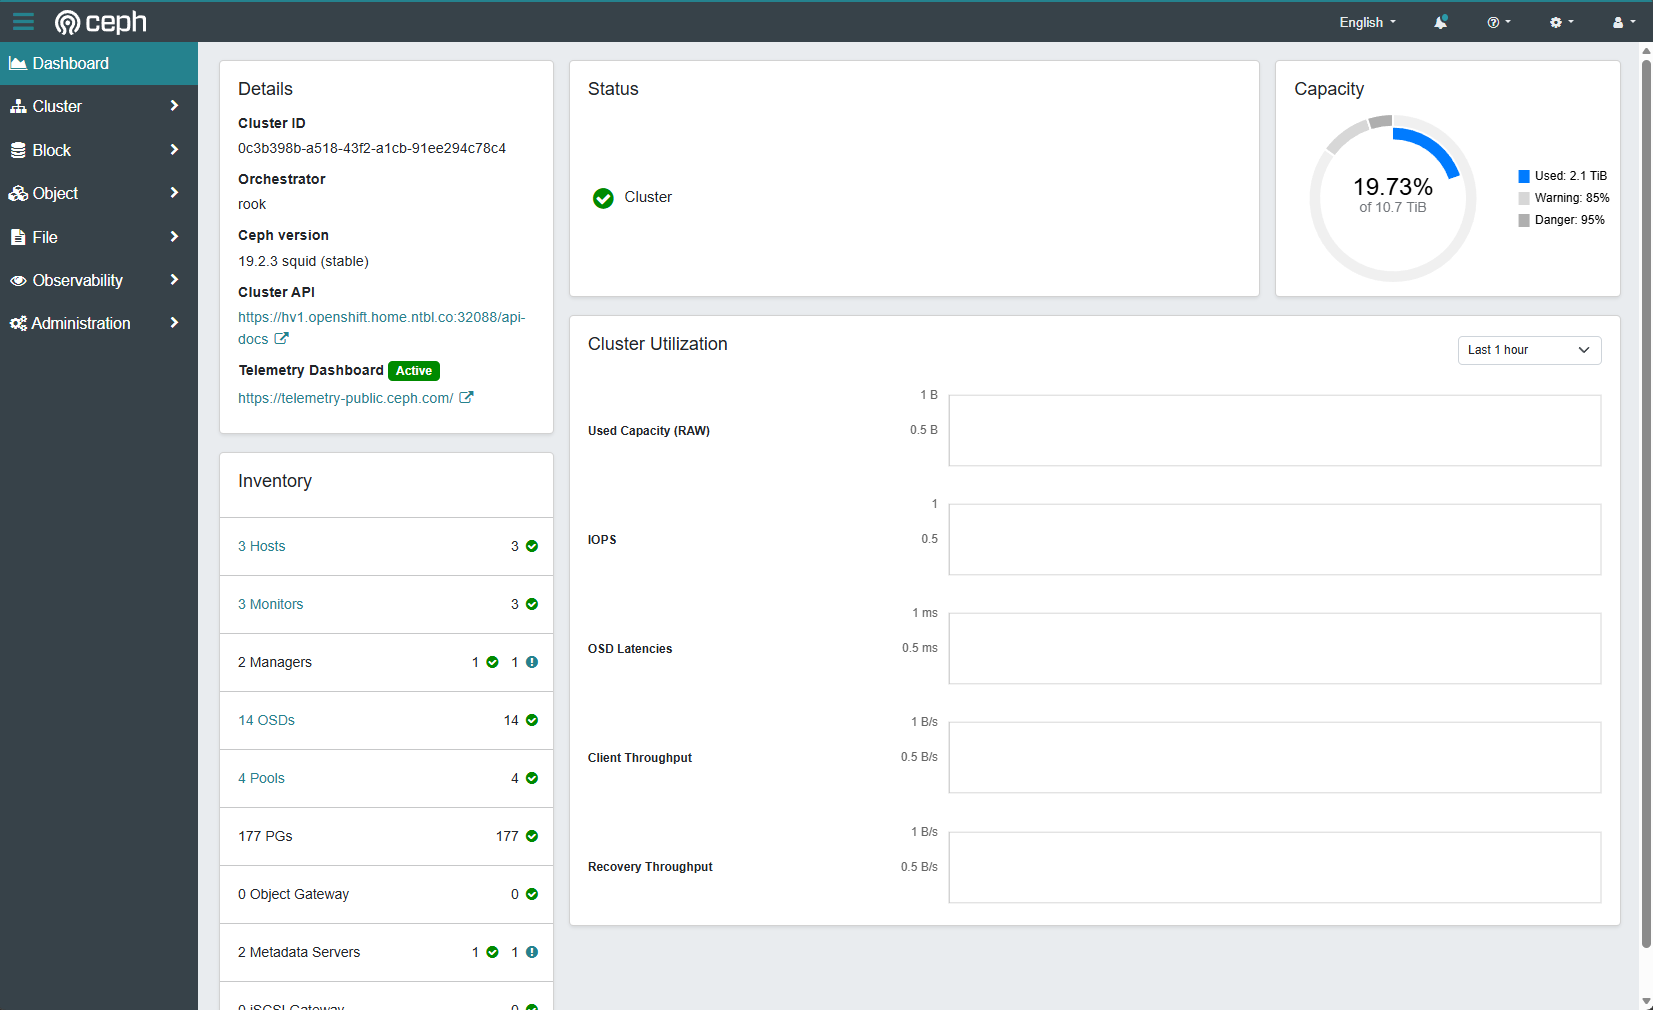
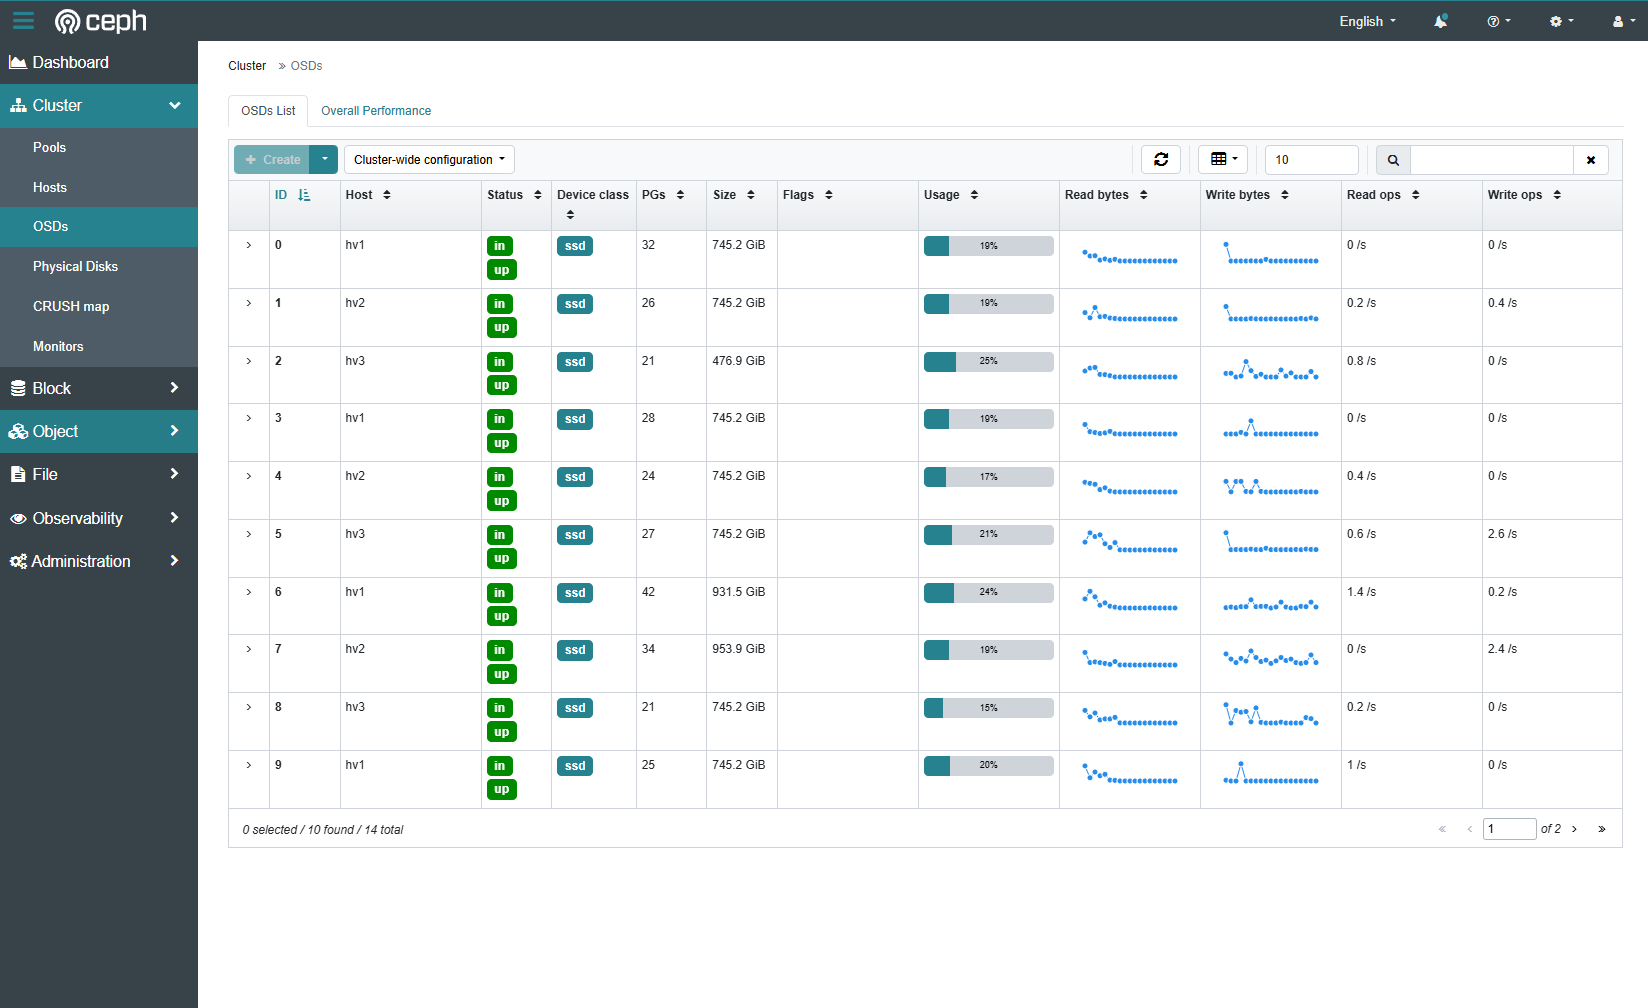
The dashboard comes with a bunch of metrics and configuration options out of the box. Optionally, you can enable additional performance monitoring or connect Ceph to Grafana for metrics.
Some helpful info
One helpful thing to enable is the toolbox for Ceph. This is an additional pod that will run and have all the Ceph tools ready for you.
oc apply -f ./rook/deploy/examples/toolbox.yaml
After the pod starts run:oc exec -it -n rook-ceph deployment/rook-ceph-tools -- bash
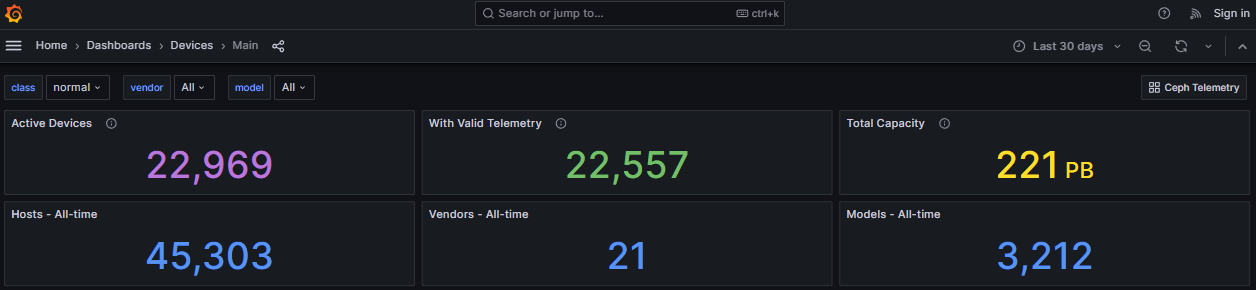
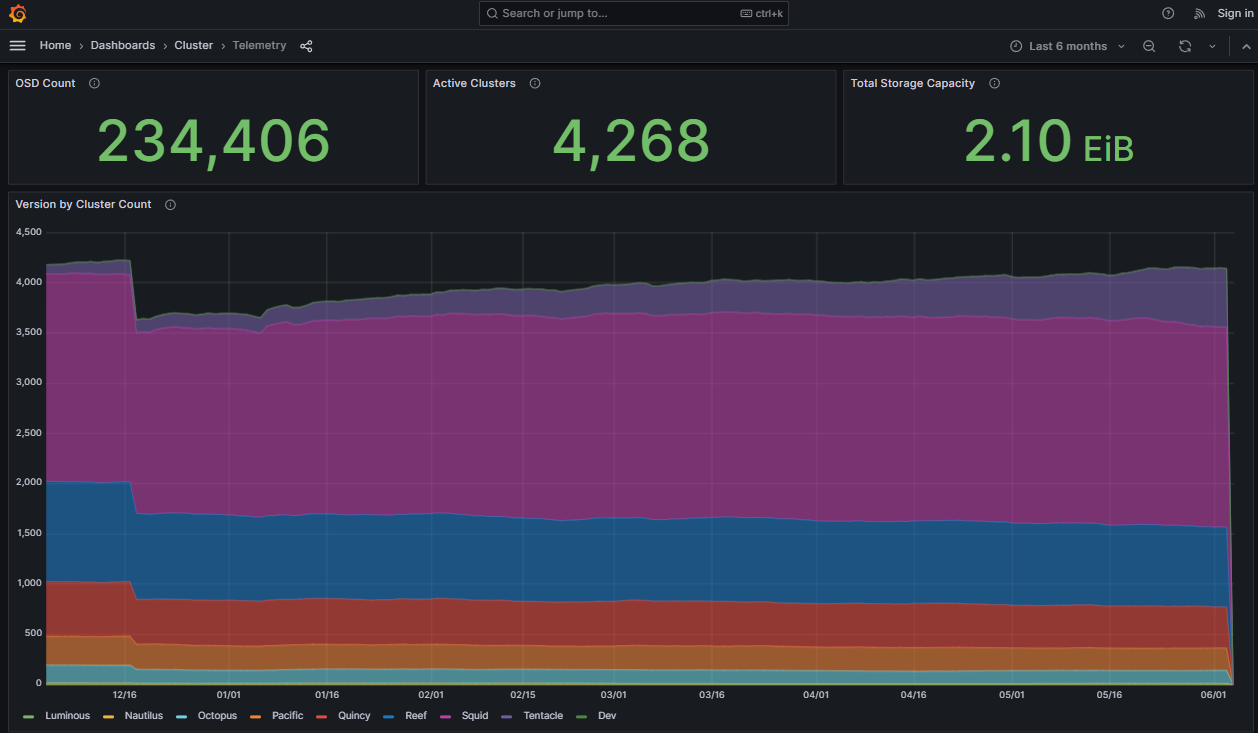
Welcome to the world of Ceph. Commands like ceph status become your friend. The dashboard has most of this information in GUI format, but the commands have all the power to change settings. Ceph has anonymous metrics you can enable, at https://telemetry-public.ceph.com/ they have public Grafana dashboards of all the clusters checking in worldwide!
After struggling through getting it to work the first time, I found a blog which lays a similar workflow out nicely. I’ll leave it here in case their notes help anyone!