Software

OpenAFS @RPI Client

Recently I was told “I can’t remember anyone getting OpenAFS to work on their own”, by a staffer at my school. I took it on myself then to figure out how to get this working for students. And in the end I wrote an app that will automatically download and install the AFS client, then configure drives for you. This was an experiment in threading and using WPF instead of Windows Forms.

First the app goes and downloads the OpenAFS client, if it is a 64 bit machine it grabs the 32 bit tools first then the client. While downloading and installing these things it connects via SSH to a school server to get the location of the user’s home folder as well as verify the credentials given.

Once installation is complete the program runs ‘klog’, this goes to the AFS server and requests tokens in the cluster using the credentials given earlier. Once we are past the installing point all these actions need to be run on the campus network. When the program starts it tries to ping a couple internal servers, if it can hit more than half of them in under 75 milliseconds then it considers itself on campus; if it thinks it’s off campus, then it notifies the user. One small problem with the first release is sometimes this system gets confused by vpn taking slightly longer.

Now that we have working token the system recommends drive letters that are not in use as well as AFS spaces to mount including the users folder and ‘dept’ to start. The configure button will activate these drives, they are not set to persistent at this time.

Below is the github link, as well as the direct exe link:

Github: https://github.com/daberkow/RPI_OpenAFS

EXE: https://github.com/daberkow/RPI_OpenAFS/blob/master/OpenAFS%20Installer%20WPF/bin/Release/OpenAFS%20Installer%20WPF.exe

IPv6

As IPv6 starts to roll out more and more, and Windows to update more and more, it may be time to turn IPv6 back on your computer. I wanted to put a reminder out that the IPv6 Cleaner also has a tool built in to change the IPv6 setting of the machine. After changing the setting reboot and Windows will take the new setting. IPv6 Activator is the same code that runs in the 6to4 Cleaner, just as a standalone app.

The following options are avaible:

  • Enable IPv6 – Windows Default
  • Disable IPv6 except critical components – Use if card problem persists
  • Disable native IPv6 interfaces
  • Disable all tunnel IPv6 interfaces
  • Disable all IPv6 interfaces except for the IPv6 loopback interface

Download:

https://github.com/daberkow/daberkow.github.io/tree/master/6to4CardCleaner

Download:

https://github.com/daberkow/daberkow.github.io/tree/master/IPv6Activator

QuickLogs

One project I worked on last semester was for my job at RPI Helpdesk; we needed a system to track how many people came in, along with the general type of problem they were having. We had an old system in place that was written in python but it broke, and did not give the administration side that much information. I wanted to keep the same easy to use interface that the previous program had, along with add features. and give more information on the back end.

This system is used to be a white webpage, with 12 options on it. Then a new interface was added for the touch screen at the desk, this interface had 12 big buttons that used JavaScript to submit it. One of them was user-error, which was not recorded. There was nothing else on the page but these 12 buttons, which tracked the number of clicks per week.

An entire code rewrite was planned; MySQL was going to be used for the database, while the front end was JavaScript and PHP. JQuery was used to make JavaScript work easily across browsers.

While I was making this I was thinking of things I could add to the software, first the old options were built into the tool; instead of having the options build in the database holds available options and which ones the administrator wants active. The new version connects to the CAS (Central Authentication System) of the school; once users are authenticated they are given rights.  Administrators get a settings option given to them, which standard users don’t ever see that option.

JavaScript was used for the button submits, this way the entire page doesn’t have to refresh. At the request of the helpdesk workers, an indication was put in that the ticket was submitted successfully. The top right corner displays “Recorded, entry: #”, this starts at a black box and fades into that number.

The look started as a genetic design, but then at version 3.2 the program look on the look of the Print Queue webpage that the helpdesk hosts. This is the start to a unified look to helpdesk software. As a side note, the version numbers started at 3 because this is the third version of QuickLogs to my knowledge.  Also the main interface is in a folder called “lite” because for a time a enhanced interface was being worked on, a entire ticketing system that included full descriptions, tickets, and follow ups with students who came in.  With course work, this was scarped but the folder structure remained.

One feature that wasn’t requested but I put in for fun was ticket tracking, when a user is not logged in and hits a button then the transaction is recorded under user “default”. When a user is logged in then they are given credit for the ticket. This doesn’t effect anything with the users work, no incentives were given, just friendly competition. The system was in use for about half a semester and this feature was not used at all. Then when a handful of users started using that system, it snowballed into more and more of the users logging in. Now users wanted to beat their coworkers and thus remembered to log a lot more often then before when the data went into a black hole. Later we found in the code there was a stats page, but this was not shown to anyone but administrators who knew about it. Also the old system did not have any long-term user facing statistics, it gave the weekly number then reset. The new system graphs 30 days of problems, what percentage went to each; last 30 days tickets per user; finally, a chart of 24 hours, 7 days, 30 days, 90 days, 365 days and all time tickets recorded. That way the user gets to see their part in records recorded.

Another problem in the past for software like this has been a lack of documentation and information, after a student graduated and built a system like this all the knowledge was lost, it ran until it broke and a new person took over building a new one. Here the code was put on GitHub, all commented up.

That is a general overview of the QuickLogs project. It was a good learning experience for writing a whole web system. I got a enjoyment out of seeing people really use the system, and give feedback. At 8 months in there are around 5,000 records in the system at this point. Below is a gallery of two of the old interfaces, with 3 of the new ones.


GitHub: https://github.com/daberkow/QuickLogs

Summer 2012

The blog has been silent for a little while. I have been working at Cisco developing training software. Unfortunately the software is for internal use and at this time I am limited what I can say about it. But 3 months later and around 10,000 lines of code later I handed off the project to my coworkers.
Now back to school to continue studies, I think it is time for the Jukebox project to start up again. I have been researching libraries to use to play music and at this early point it may be the Mono version of XMA to play audio files. If anyone has any ideas for a java/mono/any Linux working library for mp3s that is easy pass it my way.

HTML5 Practice

One project I had the idea for and played around with is a Time Manager. I wanted to be able to track events and how much time I spent on different things. The problem is that I have a thousand classes and have to finish up things for the semester, so I put a few hours into this and I am going to shelf it for now.

A cool aspect of this (along with hindrance) is the system uses Web SQL, this is a HTML5 system; instead of using a MySQL or other centralized SQL database, your local browser is the SQL server. There are limitations to this, including the spec is new and limited. Along with it only seems to work in Chrome, Safari, and Opera; I have a spot in the code so if it fails to connect to a local data store it can switch to a more traditional method but I never got to that. It also tracks modified items to eventually it could sync those items to a central server, but that never got completed so its not in the github. Everything loads on one page and uses Javascript heavily to modify that page. I put facebook login in the system, I wanted a login system that I didnt have to worry about and I have never used facebook login before.

You can check it out at http://ntbl.co/time/ along with all the code at https://github.com/daberkow/Time-Manager

Jukebox Audio Player

I have been working on the Jukebox project while code for the Enstall project client is being worked on. I had to find a music playing library that would be fairly portable. While C# with mono can easily transport Windows, Linux, and Mac, I could not find a audio library that did that. I wanted to be able to decode mp3 files as well as other compressed audio formats.
One option I had was converting all the audio files to WAV files or OGG, but these files are significantly bigger; along with, going from a lossy format to those would be a waste of resources. After looking at around 6 audio solutions I went with the easiest. To the horrors of many, and the silent screams of some, I detect your OS, then unpack that OS version of VLC. Once unpacked it starts with only a Telnet interface; with this interface, another thread logs in and controls VLC. So I have a standardized communications language, and I don’t have to handling decoding, audio cards, audio channel selecting, ect.
If you have not used this before it is built for a program to control it, there are controls such as “get_playtime”. You get a nice computer readout from that. One downside is that there are slight differences from windows to Mac to Linux, but those are easily accounted for.
If anyone has another easier solution drop it in the comments but for cross compatibility this seems to be working well.

Enstall Project

I am working on a project called Enstall with a partner for RCOS @ RPI, it’s available at enstall.wordpress.com, the goal is to make a package management system. One may say “but Dan there are like 10 available and one or two are already open source…” That is true but most of them are aimed at IT personel, and controlling all the computers in a corporation, this is just for a student to install and get software from their school on their PERSONAL computer. That’s the dream.

PHP/JS and C# Encryption

Here is some code from a project I have been working on and then shelved. A C# (mono) project creates a RSA public/private key pair, then gives the public side to a MySQL database. The private side is saved to the hard drive for later. Then PHP dynamically adds the currently active key public portion into javascript, which encrypts the users input, and saves it to MySQL. Then the C# application can get the keys it has saved in a good place, and decrypt the data in the database. Benefits of this include the web data is secured from the client to the server, and even if somehow someone steals your database off your webserver, they dont have the encryption keys to take it away. This system also has a way to deactivate a old key and move to a new one, if more code was put into it someone could revoke a old key and migrate all the data using it to a new key, but that wasn’t implemented. I thought this would be a cool project and I learned a lot about RSA public private keys, a lot of languages handle the keys differently; some take it in hex, some do it differently, some call the parts one thing, some call them other names. The javascript portion is based mostly off this library (link). JQuery is used for ease.

Feel free to give feed back or use this, open source fun.

https://github.com/daberkow/PHP_PublicKeyDemo

Creating a Radio Part 3 – Computer and Software

This is article 3 of the Building a Radio Series, before we looked at the general project overview, along with how the Arduino was hooked up. Now we will be looking at the PC hardware along with the code being used to do all the music.

I was afraid that this project world have one critical weakness, that the pc running the show would end up taking a while to start up; making the whole thing slow and by the time it came up you didn’t want to use it. I ended up getting Intel D510MO, but any computer that runs Windows would do. To save myself from having to write my own music player/interface over a music player this project relied on Windows Media Player using C#. This made it really quick and easy to build the DJ software. Mine had 1GB of ram, and an 8GB Kingston SSD (model S100S2/8G), and a Kingston 19-in-1 media card reader. There was a USB hub in there so it could be just 1 USB cable instead of 2.

I have a MSDN account so I was able to get Windows XP really easily, it theoretically could have been Windows 2000 or newer, but I was worried about drivers for Windows 2000, so I went with the next lightest OS. I went through and cleaned it out a lot, disabling parts of Windows I didn’t need; there are a lot of guides online to speed up Windows XP. Just make sure Windows Media Player is on whatever OS you use, I was developing on Windows 7 Enterprise and it didn’t have it. I freaked out will I realized I just had to go to Add/Remove Programs -> Windows Components and add it. As mentioned in the earlier article, the speaker in the unit went to a USB sound card. The USB sound card ended up being a good amount louder than the built-in sound card. The code adjusts the Media Player sound volume, not Windows volume.

The software is commented, so if you are interested in depth, you may want to scroll down and download that. But a quick overview, the program scans for removable cards, and then it scans them for the folder structure it uses. Then if there is only one card that meets these criteria mounts it as its source. Then it goes to the com port that is saved in a settings file in the same location of the program. If the interface is used to change the interface it should change it in the settings file. One problem is I was under the clock in this project, thus my usual extensive testing wasn’t done; it is possible bugs exist, but I think I found all the big ones.

A thread is spawned off to get input from the knobs, this is a separate thread so it can change settings while other things are going on. It reads the input from the Arduino, and makes adjustments when needed. In the boot process it gets the channel number so that the radio knows where to build a playlist out of. It gets the songs, mixes them up then adds them to a list, it then grabs all the “spots” mixes them up and puts one in every 4 songs. After all this 30 minutes of static is put in; in theory once that starts there is a 30 minute timer to shutdown.

That is the basic view of the software; the code is available below, with comment that anyone can have fun with. Any questions can be emailed and/or posted on the blog. This wraps up the Building a Radio series, unless I think of anything else to put up about it. If anyone has a idea of another project shoot me a email.

(LINKS)

https://github.com/daberkow/RadioManager

Creating a Radio Part 2 – Arduino & Wiring

This is article 2 of the series on building a Radio. A key part of the project is the interface; I wanted to keep 100% of the original radios look and feel; that meant somehow I needed to use the knobs in the front along with the spinning the dial. The solution I came up with was to use an Arduino microcontroller, more specifically the Arduino Uno, to handle all the hardware interactions. This article will look at how it was hooked up, along with the code used for it. For the purposes of this article I will not go into too much detail about the parts, and allow the reader to research where needed.

In total there are 5 “devices” hooked up to the Arduino, the first three of these were the knobs. The volume knob, an original knob that came with the unit, feeds the Arduino a number, 0-1023 using a 5 Volt line, then that was mapped to a number between 0-100 to make life easy. The leftmost knob goes between AM/FM/AMC, and on my unit I could never get a stable reading out of it to feed the Arduino, so this knob is actually disabled on my final product. I could have replaced that knob with another, but I felt the project was great without that, along with it would have added a lot of work and stations to make. The center knob is a 10kΩ potentiometer I bought from makershed.com, they seemed to have a size that fit well; I had to drill down the inside of the plastic knob, but that’s how these things go. The two wires I got from the potentiometers each went into their own analog pin, I used 5 for the volume knob and 2 for the station, but this is completely arbitrary.

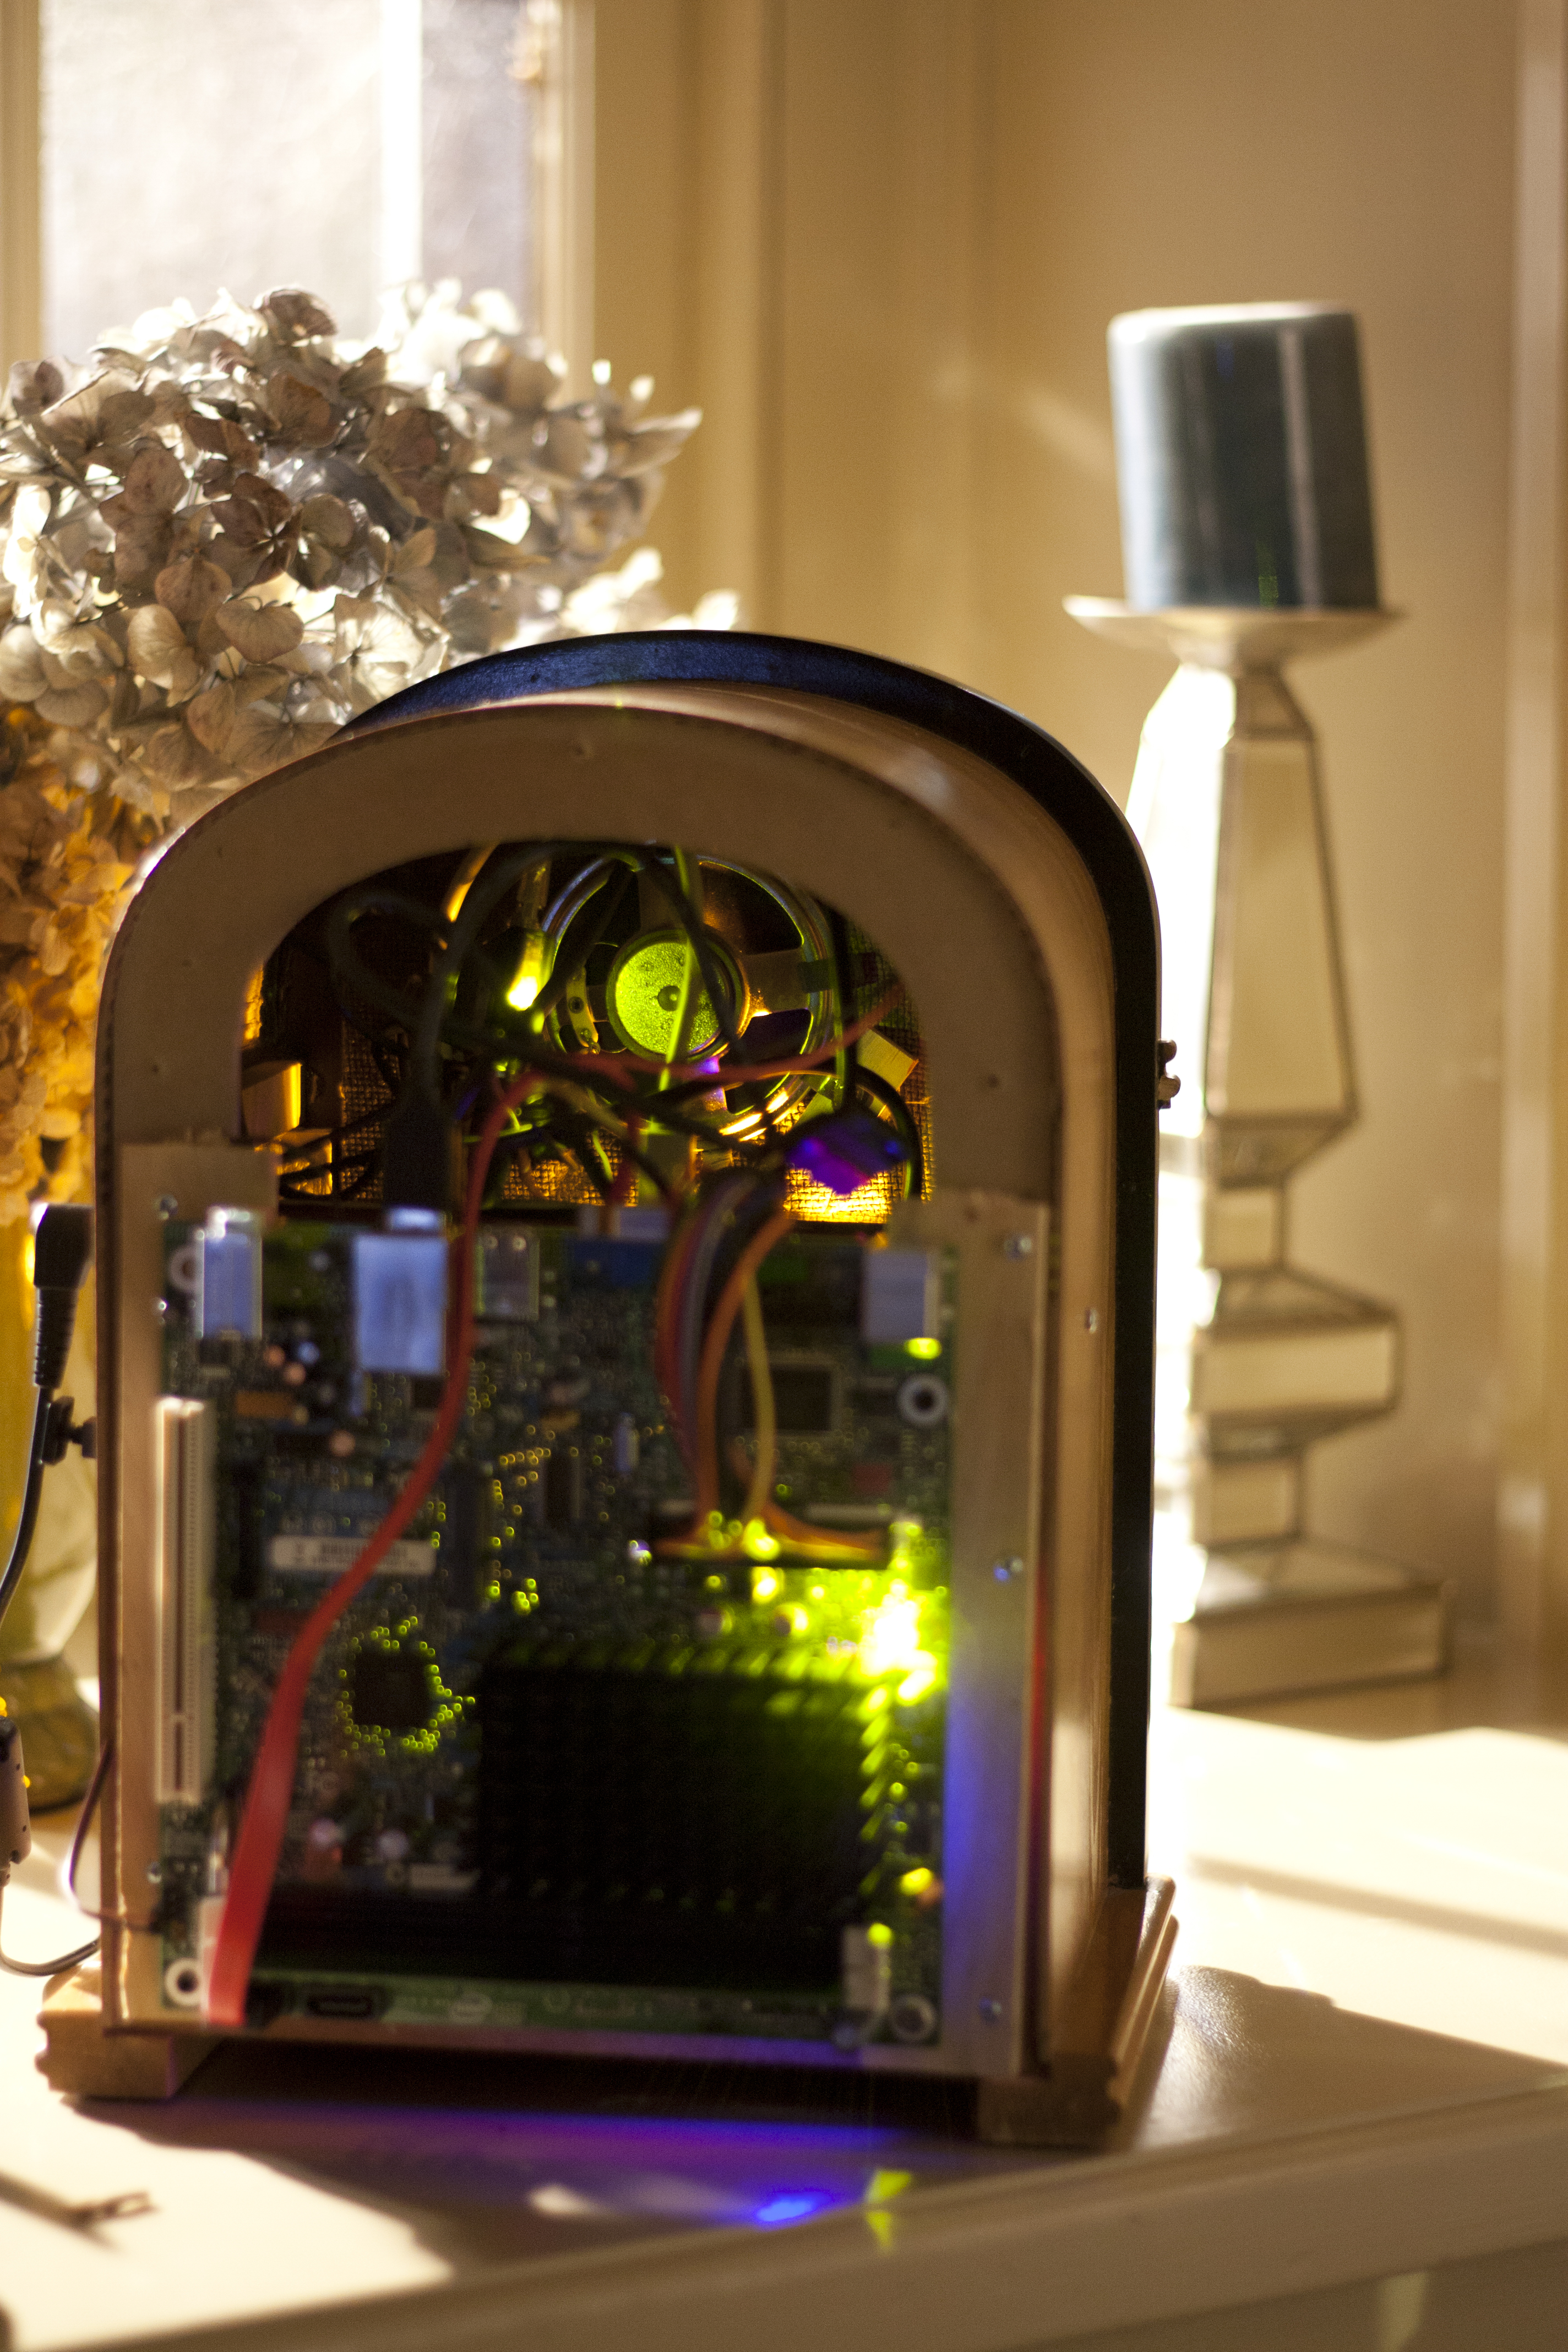
At this point I should mention that devices like the servo came with a little header on their wires. I took that piece on, and soldered a good wired onto the end to put in the Arduino. The wire the servo came with was thin and didn’t go in a pin well. Moreover all the parts needed power, so I got a tiny bread board from THE SHACK, took over one two row part of it that had double sided tape and put it in the radio. Then whenever I needed 5 volts, I could just use another pin in the bread board. You can see this in the photo below.

The next device to hook into the microcontroller was the servo, now as I said in the last article where I went over me tearing parts out of the original unit; the station knob was done with a string and a sensor and awfulness. Thus, I am using a servo instead; the code gets the input from the station knob, and then adjusts the servo to that mapped value. I got a HexTronik HXT900 Micro Servo 9g/1.6kg off Amazon for cheap; it works well, is tiny, and did everything the project needed; yet, it is fairly loud, so if that is important to you (when the station changes you hear it) then you may want another one. I put the servo in Pin 9 on my Arduino.

The last little device that was hooked up just for fun was a little yellow LED; my radio had a burnt out bulb next to the dial, so I replaced that with a LED. The 13 pin on the Arduino Uno already has a resister on it for a LED so I just put it in there.

The code is fairly simple and straight forward, it reads all the knobs, adjusts the dial when needed, and then sends all its readings over USB to the PC doing the music playback. The baud rate is set for 9600. The one little problem the Arduino code gave me that I didn’t foresee was I needed a set “packet” length to go to the pc, thus when the PC reads the line it knows if it got the whole data set or not reliably. To do this I have a set pattern that the data is fit into. It goes | then whatever the volume is | channel number | and then enough dashes to fill up 10 characters. So an example could be |100|5|— . I thought it was a fun and interesting little quirk.

The system waits 200ms, to let the values change and stabilize if they want, then does it all again. I am used to desktop programming where 100% CPU is bad, so I treated this similarly by habit, but you could speed it up if you wanted. The code is going to be in here to follow (its pde, but rename to TXT works too), along with a picture of the wiring (though some wiring may have changed in final product, old picture).

One part I have yet to mention that is a critical component is the speaker, I used the speaker that came with the unit. I cut the wire from the original circuit, then got a 3.5mm stereo jack from THE SHACK and soldered the wires onto that after making sure that I got positive and negative in the write positions. I can’t guarantee this will work with all radios but that plug was able to go right into a USB audio card I used.

Feel free to email or post with questions. The next part will be the PC and the software running all of this.


https://github.com/daberkow/RadioManager/blob/master/radio_controller.pde